Last Updated on October 22, 2026 by D. Ruddy
Preserving the vibrant color and crisp texture of how to freeze green beans fresh is easier than you think. Freezing fresh green beans locks in their nutrients and flavor, making them a convenient addition to meals year-round. Whether you’ve harvested a bumper crop from your garden or scored a great deal at the market, this method ensures your beans stay fresh-tasting for months.
You can freeze fresh green beans by blanching them in boiling water for 3-4 minutes, cooling in ice water, draining, and packing into airtight containers. This process preserves color, texture, and nutrients for up to 12 months.
What You Need Before You Start
Before diving into the freezing process, gather all your supplies. Having everything ready ensures a smooth workflow and prevents the beans from sitting out too long. Freshness is key here, so start with the best quality beans you can find.
- Fresh green beans (preferably young and tender)
- Large pot for boiling
- Slotted spoon or spider strainer
- Large bowl of ice water
- Clean kitchen towels or paper towels
- Air-tight freezer bags or containers
- Vacuum sealer (optional but recommended)
- Sharp knife or kitchen shears
- Cutting board
- Timer
Tip: Choose beans that are firm, bright green, and free from blemishes. Smaller beans tend to be more tender and freeze better than large, mature ones.
The blanching process is crucial as it stops enzyme actions that can cause loss of flavor, color, and texture. According to the National Center for Home Food Preservation, blanching also helps remove dirt and bacteria from the surface of the vegetables. This step is what separates properly frozen beans from those that turn mushy or develop off-flavors in the freezer.
Step by Step Process to Freeze Green Beans
Step 1: Prepare the Beans
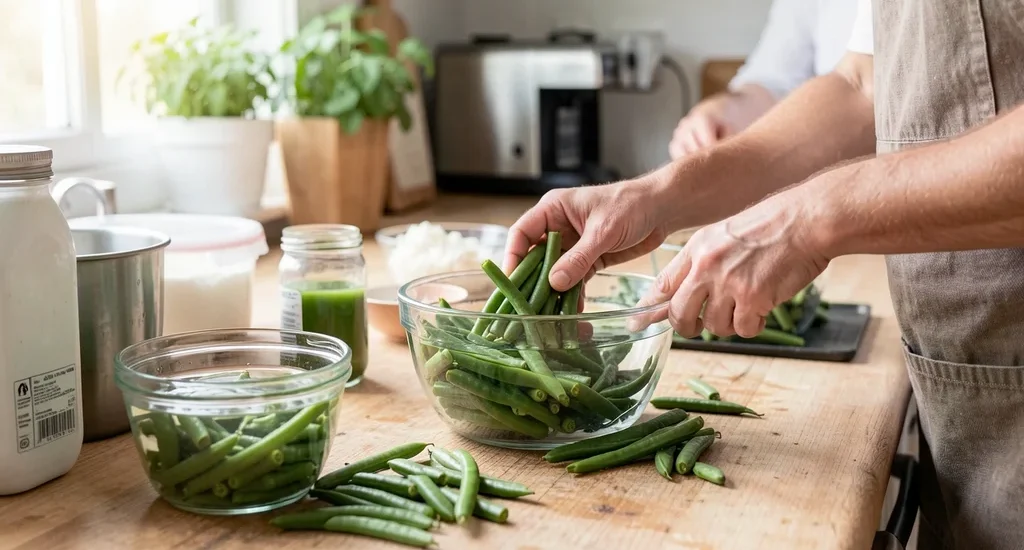
Start by washing your green beans thoroughly under cold running water to remove any dirt or debris. This is an essential first step in the process of how to freeze green beans fresh. After washing, trim the ends off each bean. You can leave them whole, cut them into bite-sized pieces, or even French-cut them lengthwise for a fancier presentation.
While trimming might seem tedious, it’s an important step. The stem end of green beans can be tough and fibrous, which doesn’t soften during cooking. Removing these ends ensures a better texture in your final dish.
If you’re working with a large quantity, consider enlisting help to make the process go faster.
Step 2: Blanch the Beans
Bring a large pot of water to a rolling boil. The pot should be large enough to accommodate the beans without overcrowding. While the water is heating, prepare an ice bath in a large bowl. The ice water should be very cold to quickly stop the cooking process.
Once the water is boiling, add the prepared green beans. It’s important not to add too many at once, as this can lower the water temperature too much. Work in batches if necessary.
The beans should blanch for 3-4 minutes. Start timing as soon as the beans enter the water.
Important: Under-blanching can be worse than no blanching at all. It can stimulate the activity of enzymes and is more harmful than not blanching. Over-blanching causes loss of flavor, color, vitamins, and minerals.
Step 3: Cool the Beans Immediately
After the blanching time is up, quickly remove the beans from the boiling water and plunge them into the ice bath. This rapid cooling stops the cooking process immediately, preserving the beans’ bright green color and crisp texture. Let the beans cool in the ice water for the same amount of time they were blanched – 3-4 minutes.
Drain the beans well after cooling. You can use a colander or simply lift them out with your slotted spoon. Spread them out on clean kitchen towels or paper towels to remove as much moisture as possible.
Excess moisture can lead to ice crystals forming on the beans, which can cause freezer burn over time.
Step 4: Dry the Beans Thoroughly
Pat the beans dry with clean kitchen towels or paper towels. The drier the beans are before freezing, the better they’ll maintain their quality in the freezer. This step is often overlooked but is crucial for preventing ice crystals from forming on the surface of the beans.
If you’re freezing a large quantity, you might want to spread the beans out on a baking sheet lined with paper towels to air-dry for a few minutes. This can help remove any lingering moisture that patting might have missed.
Step 5: Package for Freezing
Once the beans are completely dry, it’s time to package them for the freezer. There are several options for packaging:
- Freezer bags: These are a popular choice as they’re space-efficient and can be laid flat to save space. Squeeze out as much air as possible before sealing.
- Rigid containers: These can be good for smaller quantities and are easy to stack in the freezer.
- Vacuum-sealed bags: This is the gold standard for long-term freezer storage as it removes virtually all air, preventing freezer burn.
Warning: Never freeze green beans in glass containers that aren’t specifically designed for freezer use. Regular glass can crack or shatter when exposed to extreme temperature changes.
When packaging, consider portion sizes. It’s often most convenient to freeze beans in the quantities you’re likely to use in recipes. For example, if you typically use 2 cups of green beans in a stir-fry, package them in 2-cup portions.
This way, you can take out exactly what you need without having to thaw more than necessary.
Step 6: Label and Freeze
Label each package with the date and contents. While it might seem obvious now, it’s easy to forget what’s in your freezer over time. Use freezer-safe labels or masking tape and a permanent marker.
When placing the packages in the freezer, try to lay them flat initially. This allows them to freeze more quickly and evenly. Once they’re frozen solid, you can stack them to save space.
Green beans frozen using this method will maintain their quality for 12-18 months, though they’re safe to eat indefinitely if kept at 0°F or below.
Blanching Times for Different Bean Sizes
The blanching time can vary slightly depending on the size of your green beans. Here’s a quick reference guide:
| Bean Size | Blanching Time |
|---|---|
| Small, thin beans | 2 minutes |
| Medium beans (most common) | 3 minutes |
| Large, mature beans | 4 minutes |
Remember that these are guidelines. If you’re unsure, it’s better to slightly under-blanch than over-blanch. You can always test a bean after the minimum time to see if it’s reached your desired level of tenderness.
Freezing Without Blanching: Is It Possible
While blanching is the recommended method for how to freeze green beans fresh, some people wonder if it’s possible to freeze them without this step. The short answer is yes, but with some significant caveats.
Green beans can be frozen without blanching, but they won’t maintain the same quality. Without blanching, the enzymes in the beans continue to be active, even in the freezer. This can lead to:
- Loss of color (beans may turn dull or brownish)
- Loss of texture (beans may become mushy or tough)
- Development of off-flavors
- Shorter storage life (quality may degrade after just a few months)
If you choose to freeze without blanching, the process is simpler: wash, trim, dry, and package the beans. However, be prepared for potentially disappointing results. These beans are best used in cooked dishes like soups or stews where the texture is less noticeable.
Tip: If you’re in a hurry and must skip blanching, at least blanch the beans for 1 minute. This partial blanching is better than none at all and can help preserve some quality.
According to the University of Georgia Cooperative Extension, unblanched beans may only maintain good quality for about 4-6 months in the freezer, compared to 12-18 months for properly blanched beans. For the best results, blanching is strongly recommended.
Best Freezer Containers for Green Beans
The type of container you use can significantly impact the quality and storage life of your frozen green beans. Here’s a comparison of the most popular options:
| Container Type | Pros | Cons | Best For |
|---|---|---|---|
| Freezer bags | Space-efficient, can be laid flat, inexpensive | Can be punctured, harder to remove air | Short to medium-term storage |
| Rigid plastic containers | Durable, easy to stack, reusable | Bulky, take up more space | Medium-term storage, frequent use |
| Vacuum-sealed bags | Best protection against freezer burn, longest storage life | Requires special equipment, more expensive | Long-term storage |
| Glass jars (freezer-safe) | Eco-friendly, reusable, don’t absorb odors | Heavy, can break, require headspace | Short-term storage, liquid-free packages |
For most home freezers, freezer bags are the most practical choice. They’re affordable, space-efficient, and widely available. If you plan to store your beans for an extended period or want the best possible quality, consider investing in a vacuum sealer.
The initial cost is higher, but it pays off in better-tasting beans and less freezer burn.
How to Thaw and Cook Frozen Green Beans
One of the great advantages of properly frozen green beans is that they can often be cooked directly from the frozen state. However, there are times when you might want to thaw them first. Here’s how to do both:
Cooking from Frozen
Most cooking methods work well with frozen green beans straight from the freezer:
- Boiling: Add frozen beans directly to boiling water. Cook for 5-8 minutes or until tender. No need to thaw first.
- Steaming: Place frozen beans in a steamer basket over boiling water. Cover and steam for 6-10 minutes.
- Sautéing: Add frozen beans to a hot pan with a little oil or butter. Cook for 8-10 minutes, stirring occasionally.
- Roasting: Toss frozen beans with oil and seasonings, then roast at 425°F (220°C) for 15-20 minutes, stirring once.
- Microwaving: Place frozen beans in a microwave-safe dish with a little water. Cover and microwave on high for 4-6 minutes, stirring once.
Thawing Before Cooking
If you prefer to thaw your beans first, there are a few methods:
- Refrigerator thawing: Transfer the frozen beans from the freezer to the refrigerator and let them thaw overnight. This is the safest method and preserves the most texture.
- Cold water thawing: Place the sealed package of beans in a bowl of cold water. Change the water every 30 minutes until the beans are thawed (about 1-2 hours).
- Microwave thawing: Use the defrost setting on your microwave to thaw the beans. Be careful not to start cooking them.
Warning: Never thaw green beans at room temperature. This can allow bacteria to multiply to unsafe levels. Always thaw in the refrigerator, in cold water, or in the microwave.
Once thawed, use the beans within 2-3 days. Don’t refreeze beans that have been thawed, as this can significantly degrade their quality. Cooked thawed beans can be refrigerated for 3-4 days, but they’re best used immediately for the best texture and flavor.
Common Mistakes to Avoid When Freezing Green Beans
Even with the best intentions, it’s easy to make mistakes when freezing green beans. Here are the most common pitfalls and how to avoid them:
- Skipping the blanching step: As mentioned earlier, blanching is crucial for preserving color, texture, and flavor. Skipping this step will result in beans that are dull, mushy, and may develop off-flavors.
- Over-blanching: Blanching for too long can make the beans too soft before they even hit the freezer. This leads to a mushy texture when cooked later.
- Under-blanching: Not blanching long enough can be worse than not blanching at all, as it can stimulate enzyme activity.
- Not drying the beans thoroughly: Excess moisture leads to ice crystals, which can cause freezer burn and affect the texture of the beans.
- Overpacking freezer bags: Filling bags too full can make it difficult to remove all the air, leading to freezer burn. Leave some headspace for the beans to expand as they freeze.
- Using poor-quality beans: Freezing won’t improve the quality of your beans. Start with the freshest, highest-quality beans for the best results.
- Storing at inconsistent temperatures: Fluctuating temperatures in your freezer can cause ice crystals to form and grow, leading to freezer burn and texture degradation.
- Not labeling packages: It’s easy to forget what’s in your freezer over time. Always label your packages with the contents and date.
According to a study by the Journal of Food Science, improper freezing techniques can lead to a 50% loss in vitamin C content in green beans. Proper blanching and freezing methods help retain more of the beans’ nutritional value.
How to Tell If Frozen Green Beans Have Gone Bad
While properly frozen green beans can last for a long time, they don’t keep indefinitely. Here’s how to tell if your frozen beans are still good or if they’ve gone bad:
Signs of Freezer Burn
Freezer burn doesn’t make food unsafe to eat, but it can affect quality:
- Ice crystals or frost on the surface of the beans
- Dry, leathery, or shriveled appearance
- Dull or faded color
- Tough or rubbery texture after cooking
If your beans show signs of freezer burn, they’re still safe to eat but may have a less appealing texture. You can trim off any heavily freezer-burned portions before cooking.
Signs of Spoilage
These signs indicate that your beans may be unsafe to eat:
- Off or sour odors
- Slimy texture
- Mold growth
- Discoloration that’s not just freezer burn (e.g., dark spots or blackening)
- Package is damaged or has been opened
Important: If you notice any signs of spoilage, it’s best to discard the beans. When in doubt, remember the old adage: “When in doubt, throw it out.”
If your beans have been in the freezer for an extended period but don’t show any signs of spoilage or freezer burn, they’re likely still safe to eat. However, their quality may have degraded, and they might not taste as good as freshly frozen beans.
Frequently Asked Questions
Can I freeze green beans without blanching?
Yes, you can freeze green beans without blanching, but it’s not recommended. Without blanching, the beans are more likely to develop off-flavors, lose their color, and become mushy when cooked. The quality won’t be as good as properly blanched beans, and they may only last 4-6 months in the freezer instead of 12-18 months.
How long do frozen green beans last?
Properly blanched and frozen green beans will maintain their best quality for 12-18 months in the freezer at 0°F (-18°C) or below. They remain safe to eat indefinitely if kept frozen, but their quality will gradually degrade over time. For the best flavor and texture, try to use them within the first year.
Do I need to thaw frozen green beans before cooking?
No, you don’t need to thaw frozen green beans before cooking. In fact, most cooking methods work better when the beans are cooked directly from the frozen state. This includes boiling, steaming, sautéing, roasting, and microwaving.
Thawing is only necessary if you’re adding the beans to a dish that won’t be cooked further, like a salad.
Why do my frozen green beans turn brown?
Green beans may turn brown in the freezer due to enzyme activity, which isn’t properly stopped by blanching. This can happen if the beans weren’t blanched long enough or if they weren’t cooled quickly enough after blanching. Using water that’s not hot enough during blanching can also lead to browning.
To prevent this, make sure your water is at a full rolling boil before adding the beans.
Can I refreeze green beans after thawing?
It’s not recommended to refreeze green beans after thawing. Each time you freeze and thaw food, its quality degrades. Refreezing can lead to a significant loss of texture and flavor.
Additionally, each thawing increases the risk of bacterial growth. If you’ve thawed more beans than you can use, cook them and then refrigerate the cooked beans for up to 3-4 days.
Final Thoughts
Mastering how to freeze green beans fresh is a game-changer for preserving your harvest or taking advantage of seasonal sales. The key steps—washing, trimming, blanching, cooling, drying, and proper packaging—ensure your beans retain their color, texture, and nutrients. With properly frozen green beans on hand, you’ll always have a convenient, healthy vegetable ready for quick meals, side dishes, or hearty casseroles.
Start with quality beans and follow the process carefully, and you’ll be rewarded with delicious green beans year-round.