Last Updated on October 23, 2026 by D. Ruddy
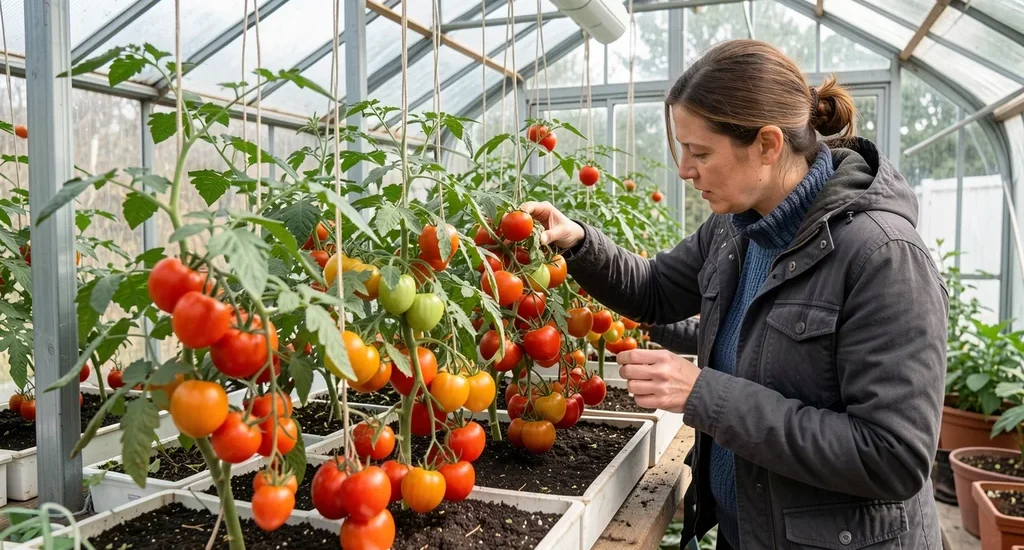
If you’ve ever wondered can I grow tomatoes in heated greenhouse in winter, the answer is a resounding yes—but success depends on the right setup. Winter tomato growing is possible with consistent warmth, proper lighting, and careful variety selection. This guide covers everything you need to know to cultivate juicy, homegrown tomatoes even in the coldest months.
Yes you can grow tomatoes in a heated greenhouse in winter if you maintain temperatures between 60-75°F during the day and 55-60°F at night. Choose cold-hardy varieties, supplement natural light with grow lights, and ensure proper humidity and pollination for the best results.
Why Winter Greenhouse Tomato Growing Works
A heated greenhouse creates a controlled microclimate that mimics the warm seasons, allowing tomatoes to thrive regardless of outdoor temperatures. Tomatoes are tropical plants that stop growing below 50°F and die at frost, so consistent heat is non-negotiable. However, warmth alone isn’t enough—light intensity and duration drop in winter, so supplemental lighting becomes essential.
Greenhouses also protect plants from harsh winds, snow, and temperature fluctuations. With proper insulation and heating, you can extend the growing season indefinitely. According to the University of New Hampshire Extension, greenhouse-grown tomatoes can produce yields comparable to summer crops when conditions are optimized.
- Temperature control prevents cold shock and frost damage
- Extended daylight via grow lights compensates for short winter days
- Humidity regulation reduces disease risk and improves plant health
- Pollination assistance ensures fruit set in the absence of natural pollinators
- Pest protection keeps common garden invaders at bay
Tip: Use a thermostat-controlled heater to maintain steady temperatures. Sudden drops can stress plants and reduce yields.
Best Tomato Varieties for Winter Greenhouse Growing
Not all tomatoes perform equally in winter conditions. Compact, early-maturing, and cold-tolerant varieties are your best bets. Determinate (bush) types often outperform indeterminate (vining) varieties in controlled environments because they require less pruning and support.
Look for disease-resistant strains to minimize issues in the enclosed space.
Some varieties have been bred specifically for greenhouse cultivation. These tend to be more adaptable to artificial lighting and consistent temperatures. The Royal Horticultural Society recommends selecting seeds labeled as “greenhouse” or “indoor” for best results.
| Variety | Type | Days to Maturity | Cold Tolerance | Best For |
|---|---|---|---|---|
| Siberian | Determinate | 60-70 | High | Cold climates |
| Tiny Tim | Determinate | 55-65 | Moderate | Containers |
| Stupice | Indeterminate | 60-70 | High | Early harvests |
| Red Robin | Determinate | 55-60 | Moderate | Small spaces |
| Glacier | Determinate | 65-75 | High | Reliable yields |
For beginners, start with Tiny Tim or Red Robin—both are compact, easy to manage, and produce well in containers. If you’re aiming for larger harvests, Stupice and Siberian are excellent choices for their cold tolerance and flavor.
Setting Up Your Heated Greenhouse for Tomatoes
Your greenhouse setup is the foundation of winter tomato success. The structure itself should be well-insulated to retain heat and minimize energy costs. Double-walled polycarbonate panels offer better insulation than single-layer plastic or glass.
Ensure the greenhouse is properly sealed to prevent drafts, but include ventilation options to regulate humidity and prevent mold.
Heating systems vary in cost and efficiency. Electric heaters are precise but can be expensive to run, while propane heaters offer more heat output per dollar but require proper ventilation. Radiant heaters are ideal for greenhouses because they warm plants directly without heating the air excessively.
According to Greenhouse Grower magazine, radiant heating can reduce energy costs by up to 30% compared to forced-air systems.
Essential Equipment Checklist
- Heater (electric, propane, or radiant) with thermostat control
- Grow lights (LED or high-pressure sodium) for supplemental lighting
- Thermometer/hygrometer to monitor temperature and humidity
- Ventilation system (fans, louvers) for air circulation
- Insulation (bubble wrap, thermal blankets) for heat retention
- Shelving/benches to maximize vertical space
- Automatic watering system (drip irrigation recommended)
Important: Place heaters at plant height, not at the greenhouse ceiling. Heat rises, so floor-level temperatures can be significantly colder than at the top.
Lighting Requirements for Winter Tomatoes
Light is often the limiting factor for winter tomato production. Tomatoes need 14-16 hours of light daily for optimal growth, but winter days may provide only 8-10 hours of weak sunlight. Supplemental grow lights are essential to fill this gap.
LED grow lights are the most energy-efficient option, providing the full spectrum of light tomatoes need while generating minimal heat.
Position lights 12-18 inches above the plant canopy and adjust as plants grow. Use a timer to maintain a consistent light schedule—tomatoes respond well to routine. The University of Massachusetts Amherst found that plants under supplemental lighting can produce up to 40% more fruit in winter greenhouses compared to those relying solely on natural light.
Light Spectrum and Intensity
| Light Type | Best For | Energy Efficiency | Heat Output | Lifespan |
|---|---|---|---|---|
| LED | All growth stages | Very High | Low | 50,000+ hours |
| High-Pressure Sodium (HPS) | Flowering/fruiting | Moderate | High | 24,000 hours |
| Metal Halide (MH) | Vegetative growth | Low | High | 10,000 hours |
| Fluorescent | Seedlings/young plants | High | Low | 10,000 hours |
For most home growers, full-spectrum LED lights are the best investment. They’re energy-efficient, long-lasting, and can be tuned to specific wavelengths for different growth stages. If you’re on a budget, a combination of cool white and warm white fluorescent tubes can work for smaller setups.
Temperature and Humidity Control
Tomatoes thrive in daytime temperatures between 60-75°F and nighttime temperatures of 55-60°F. Consistency is key—fluctuations can cause blossom drop, slow growth, or stress the plants. Use a thermostat to automate heating, and consider a backup system in case of power outages.
A study by Purdue University found that tomato plants exposed to temperatures below 50°F for more than 24 hours may suffer permanent damage.
Humidity should be maintained between 60-70% during the day and slightly lower at night. High humidity encourages fungal diseases like powdery mildew, while low humidity can cause pollen to dry out, reducing fruit set. A hygrometer helps monitor levels, and a humidifier or dehumidifier can fine-tune the environment.
Temperature and Humidity Guidelines
| Growth Stage | Day Temp (°F) | Night Temp (°F) | Humidity (%) |
|---|---|---|---|
| Germination | 70-80 | 60-65 | 70-80 |
| Vegetative | 60-75 | 55-60 | 60-70 |
| Flowering | 65-75 | 55-60 | 50-60 |
| Fruiting | 60-70 | 50-55 | 50-60 |
Warning: Avoid placing heaters too close to plants. Direct heat can scorch leaves, while uneven heating creates cold spots where plants may suffer.
Soil and Fertilization for Winter Tomatoes
Tomatoes are heavy feeders, and winter greenhouse conditions can deplete soil nutrients quickly. Start with a well-draining, sterile potting mix to avoid soil-borne diseases. A blend of peat moss, perlite, and compost works well.
Avoid garden soil, which may contain pests, diseases, or compaction issues.
Fertilize regularly with a balanced, water-soluble fertilizer (10-10-10 or 20-20-20) during the vegetative stage, switching to a higher-phosphorus formula (5-10-10 or 10-20-20) once flowers appear. According to Michigan State University Extension, tomatoes in containers may need fertilization every 7-10 days, as nutrients are flushed out with frequent watering.
Fertilization Schedule
- Seedling stage (first 2-3 weeks): Use a half-strength balanced fertilizer weekly.
- Vegetative growth (3-6 weeks): Full-strength balanced fertilizer every 7-10 days.
- Flowering stage: Switch to a bloom booster (high phosphorus) every 7-10 days.
- Fruiting stage: Continue with bloom booster, adding calcium-magnesium supplement to prevent blossom end rot.
- Maintenance: Flush soil with plain water every 4-6 weeks to prevent salt buildup.
Organic options like fish emulsion, seaweed extract, and compost tea can supplement synthetic fertilizers. Monitor plant responses—yellowing leaves may indicate nitrogen deficiency, while poor flowering could signal a lack of phosphorus.
Watering and Pollination Tips
Watering in a greenhouse requires a different approach than outdoor growing. The enclosed environment reduces evaporation, so overwatering is a common mistake. Allow the top inch of soil to dry between waterings, and always water at the base to avoid wetting the leaves, which can lead to fungal diseases.
Tomatoes are self-pollinating, but they rely on wind or vibrations to release pollen. In a still greenhouse environment, you’ll need to assist with pollination. Gently shake the plants daily or use a small brush to transfer pollen between flowers.
For larger operations, an oscillating fan can simulate wind, improving pollination rates.
Watering Best Practices
- Check soil moisture daily by sticking your finger 1-2 inches into the soil
- Water in the morning to allow foliage to dry before evening
- Use room-temperature water to avoid shocking the roots
- Avoid wetting leaves to reduce disease risk
- Drip irrigation is ideal for consistent, targeted watering
- Reduce watering slightly in winter due to slower evaporation
Tip: Use a moisture meter to take the guesswork out of watering. These inexpensive tools provide accurate readings and help prevent both over- and under-watering.
Pest and Disease Management
Greenhouses protect tomatoes from many outdoor pests, but they can also create ideal conditions for certain diseases and insects. Common greenhouse pests include whiteflies, aphids, and spider mites. These thrive in warm, humid environments, so prevention is key.
Introduce beneficial insects like ladybugs or lacewings to control pests naturally.
Fungal diseases like powdery mildew, botrytis, and early blight are also common in greenhouses. Good air circulation, proper spacing, and humidity control are your best defenses. Remove any infected leaves immediately, and avoid overhead watering.
The American Phytopathological Society reports that greenhouses with poor ventilation can see disease incidence rates up to 50% higher than well-ventilated structures.
Common Greenhouse Tomato Problems
| Problem | Cause | Solution |
|---|---|---|
| Blossom drop | Temperature fluctuations, low humidity | Stabilize temperature, increase humidity to 50-60% |
| Powdery mildew | High humidity, poor air circulation | Improve ventilation, reduce humidity, apply fungicide |
| Aphids | Warm, still air | Introduce ladybugs, use insecticidal soap |
| Blossom end rot | Calcium deficiency, uneven watering | Add calcium supplement, maintain consistent moisture |
| Whiteflies | Warm, humid conditions | Use yellow sticky traps, introduce parasitic wasps |
Preventative measures are always better than cures. Start with disease-resistant varieties, keep the greenhouse clean, and inspect plants regularly for early signs of trouble. Quarantine any new plants for a week before introducing them to your main growing area.
Step by Step Planting and Care Process
Follow this process to ensure your winter tomatoes get off to the best start. Timing is crucial—start seeds or transplant seedlings at the right stage to maximize your growing window.
Step 1: Start Seeds or Select Transplants
If starting from seed, sow them 6-8 weeks before you plan to move them into the greenhouse. Use a seed-starting mix and keep the soil warm (70-80°F) for germination. Seedlings should have 2-3 true leaves before transplanting.
For faster results, purchase healthy transplants from a reputable nursery. Avoid leggy or overgrown plants, as they may struggle to adapt to greenhouse conditions.
Step 2: Prepare the Greenhouse
Before planting, thoroughly clean the greenhouse with a mild bleach solution (1 part bleach to 9 parts water) to eliminate any lingering pests or diseases. Set up your heating, lighting, and irrigation systems and test them for at least 24 hours to ensure they’re working properly.
Arrange your planting area to allow for good air circulation. Space determinate varieties 18-24 inches apart and indeterminate varieties 24-36 inches apart. If using containers, ensure they have drainage holes and are large enough to accommodate root growth (at least 5 gallons for determinate, 10+ gallons for indeterminate).
Step 3: Transplant Seedlings
Transplant on a cloudy day or in the evening to reduce stress. Dig a hole slightly deeper than the seedling’s root ball and gently remove the plant from its container. Loosen any tangled roots and place the seedling in the hole, burying it up to the first set of leaves.
This encourages a stronger root system.
Water immediately after transplanting to settle the soil around the roots. Avoid fertilizing for the first week to allow the plants to acclimate.
Step 4: Provide Support
Most tomato varieties benefit from support, even in a greenhouse. Use cages, stakes, or trellises to keep plants upright and prevent branches from breaking under the weight of fruit. Indeterminate varieties will need more substantial support, such as a tall trellis or string system.
Install supports at the time of planting to avoid disturbing the roots later. As plants grow, gently tie them to the support using soft plant ties or strips of cloth.
Step 5: Monitor and Adjust Conditions
Check your greenhouse daily for temperature, humidity, and light levels. Adjust your heating and ventilation systems as needed to maintain optimal conditions. Monitor plant growth and watch for signs of stress, pests, or disease.
Keep a greenhouse journal to track conditions, watering schedules, and plant responses. This will help you fine-tune your approach over time.
Step 6: Prune and Train Plants
Pruning helps improve air circulation and directs the plant’s energy toward fruit production. Remove suckers (the shoots that grow between the main stem and branches) when they’re small to avoid stressing the plant. For indeterminate varieties, prune to a single or double stem for better control.
Training involves guiding the plant’s growth along its support. Regularly check for new growth and gently tie it to the support as it develops.
Step 7: Harvest Tomatoes
Tomatoes typically ripen 60-85 days after transplanting, depending on the variety. Harvest when the fruit is fully colored and slightly soft to the touch. For best flavor, allow tomatoes to ripen on the vine.
If temperatures drop unexpectedly, you can pick green tomatoes and ripen them indoors in a paper bag.
Use a sharp knife or pruning shears to harvest, cutting the stem just above the fruit. Avoid pulling tomatoes off the vine, as this can damage the plant.
Important: Rotate crops in your greenhouse to prevent soil-borne diseases. Avoid planting tomatoes or other nightshades (peppers, eggplants) in the same soil year after year.
Frequently Asked Questions
Can I grow tomatoes in an unheated greenhouse in winter?
No, tomatoes cannot survive freezing temperatures or prolonged periods below 50°F. An unheated greenhouse may provide some frost protection, but it won’t maintain the consistent warmth required for tomato growth in winter. You’ll need a reliable heating system to keep temperatures in the ideal range.
How much does it cost to heat a greenhouse for tomatoes in winter?
The cost varies depending on greenhouse size, insulation, heating method, and local energy prices. A small greenhouse (10×12 ft) with electric heaters may cost $50-$150 per month, while larger structures with propane heaters could run $200-$500 monthly. Insulation, thermal mass (like water barrels), and energy-efficient heaters can significantly reduce costs.
Do I need to pollinate tomatoes in a greenhouse?
Yes, tomatoes in a greenhouse often need manual pollination because the still air doesn’t allow pollen to transfer naturally. Gently shake plants daily or use a small brush to move pollen between flowers. An oscillating fan can also help by simulating wind.
Without pollination, flowers will drop without setting fruit.
What are the best containers for greenhouse tomatoes?
Use containers that are at least 5 gallons for determinate varieties and 10+ gallons for indeterminate types. Fabric grow bags are excellent for aeration and root health, while plastic or ceramic pots retain moisture better. Ensure all containers have drainage holes to prevent waterlogging.
Dark-colored containers absorb heat, which can be beneficial in winter.
Can I grow tomatoes year-round in a heated greenhouse?
Yes, with the right setup, you can grow tomatoes year-round in a heated greenhouse. However, you may need to adjust varieties, lighting, and care based on the season. Summer may require additional shading and ventilation, while winter demands supplemental heat and light.
Consistent monitoring and adjustments will keep your plants productive regardless of the outdoor weather.
Final Thoughts
Growing tomatoes in a heated greenhouse during winter is not only possible but highly rewarding. The key is maintaining stable temperatures, providing adequate light, and choosing the right varieties. With proper setup and care, you can enjoy fresh, homegrown tomatoes even when snow is on the ground.
Start small, monitor your conditions closely, and don’t be afraid to adjust as you learn what works best for your space.