Last Updated on September 16, 2026 by D. Ruddy
Making planters look creepy for Halloween is a fun and surprisingly easy way to add a spooky touch to your outdoor decor. This guide will show you how to transform ordinary pots into ghoulish decorations that will impress your neighbors and delight trick-or-treaters.
We’ll cover various techniques, from simple painting and embellishments to more elaborate, DIY transformations, ensuring your garden or porch embraces the spirit of the season.
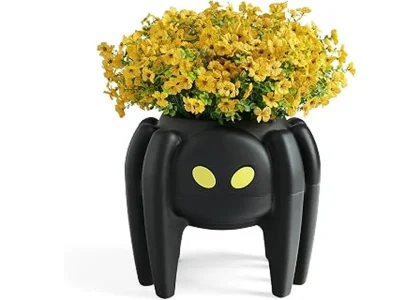
Simply put, you can make planters look creepy for Halloween by using paint, adding spooky embellishments like fake spiders and cobwebs, incorporating themed plants, and even repurposing materials to create unique, unsettling designs that enhance your festive outdoor display.
Key Takeaways
- Creepy planters can be achieved with simple painting techniques, using dark colors and distressed finishes.
- Adding embellishments such as fake cobwebs, plastic spiders, and googly eyes instantly boosts the spooky factor.
- Choosing plants with unusual shapes or dark foliage enhances the eerie aesthetic of your Halloween planters.
- Repurposing materials like old toys, skulls, or even carved pumpkins can create unique and unsettling planter designs.
- Proper sealing is important to protect your DIY creepy planters from the elements and ensure they last through the season.
What Makes a Planter Creepy for Halloween?
The essence of a creepy planter lies in its ability to evoke a sense of unease, mystery, or fright. This is achieved through a combination of visual cues that play on common fears and Halloween themes. Think dark, brooding colors, unsettling textures, and the suggestion of something sinister lurking within or around the planter.
It’s about more than just slapping a pumpkin on a pot; it’s about creating a narrative that aligns with the spooky season. This involves thoughtful design choices that transform a mundane gardening accessory into a chilling centerpiece.
What If Your Patio Became Your Favorite Spot This Fall?
Cooler evenings don’t have to send everyone indoors. Discover simple ways to turn your porch or patio into a warm, cozy place to gather after sunset.
Painting Techniques for a Spooky Finish
Paint is your most potent tool for transforming a plain planter into a Halloween masterpiece. The key is to move beyond solid colors and embrace techniques that add texture, age, and an unsettling vibe. Consider matte black or deep charcoal gray as your base to absorb light and create a sense of depth, making the planter appear more ominous.
Distressing is a popular technique that mimics age and neglect, perfect for a creepy look. You can achieve this by dry-brushing lighter colors (like white, gray, or even a muted blood-red) over your dark base, or by lightly sanding edges and raised surfaces to reveal the underlying color or material. Splatter effects using a dark red or brown paint can simulate dried blood or mud, adding a visceral element of horror.
- Matte Black Base: Provides a dark, absorbent foundation for spooky designs.
- Distressing: Use dry brushing with lighter colors (white, gray, red) or sandpaper to create an aged, worn look.
- Splatter Effects: Apply dark red or brown paint to mimic blood or grime.
- Ombre/Gradient Effects: Fade from a dark color at the bottom to a lighter, unsettling shade at the top.
- Crackle Paint: Use crackle medium between layers of paint for a shattered, aged appearance.
- Stenciling: Employ spooky stencils for ghostly faces, bats, or creepy eyes.
For an extra touch of dread, consider using glow-in-the-dark paint for subtle, eerie accents that reveal themselves in the dark. A touch of metallic paint, like tarnished silver or aged bronze, can add a gothic or haunted mansion feel. Always ensure your paint is suitable for outdoor use and consider a sealant to protect your hard work from moisture and UV rays, especially if you’re using acrylics or craft paints.
Adding Spooky Embellishments and Textures
Once your planter has a creepy base coat, it’s time to layer on the details that truly bring it to life—or, rather, to undeath. Embellishments are crucial for adding tactile and visual elements that enhance the spooky narrative. Think beyond just paint; consider adding physical items that creep viewers out.
Fake cobwebs are a Halloween staple for a reason. They instantly add a sense of neglect and mystery, making any surface look abandoned and haunted. Stretch them thinly and artfully across your planter, ensuring they catch the light and create an eerie, wispy effect.
What If Your Patio Became Your Favorite Spot This Fall?
Cooler evenings don’t have to send everyone indoors. Discover simple ways to turn your porch or patio into a warm, cozy place to gather after sunset.
Plastic spiders, of course, are a natural companion to cobwebs, but don’t stop there. Consider adding plastic eyeballs, small skeletons or skull fragments, or even fake moss for an overgrown, unkempt look. These items add depth and make the planter a focal point of Halloween dread.
| Embellishment Type | How to Apply | Creepy Effect |
|---|---|---|
| Fake Cobwebs | Stretch thinly and drape over planter. Secure with hot glue or tape. | Adds a sense of age, neglect, and abandonment. |
| Plastic Spiders/Insects | Place strategically on webs, rims, or inside the planter. | Classic creepy-crawly element; evokes fear of pests. |
| Googly Eyes / Plastic Eyeballs | Glue onto planter surface for a startled, watching appearance. | Creates a unnerving, anthropomorphic effect; feels like it’s watching you. |
| Small Skeletons/Skulls | Embed partially into the soil or glue to the exterior. | Directly invokes death and the macabre. |
| Fake Moss/Vines | Glue around the base or trailing down the sides. | Suggests abandonment and a return to nature in a sinister way. |
Use strong adhesives like hot glue or E6000 for a secure hold, especially for items that will be exposed to the elements. Consider layering different textures; for example, combining rough, gritty paint with smooth plastic spiders can create a dynamic and unsettling visual. The goal is to make the planter look as though it’s been neglected, haunted, or perhaps even is alive in a creepy way.
Warning: Ensure any added embellishments are securely attached, especially if they are small or could be a choking hazard for pets or small children who might be exploring your Halloween decor.
Incorporating Themed Plants for Maximum Eerie Effect
The plants you choose for your creepy planters can significantly amplify the Halloween vibe. Instead of cheerful blooms, opt for foliage that naturally looks a bit gothic, wild, or even sinister. Dark-colored plants, those with spiky or unusual shapes, and plants that are known for their spooky associations can turn a planter into a living horror scene.
Consider plants with deep purple, black, or dark red leaves, such as certain varieties of Heuchera (Coral Bells), ornamental peppers, or dark-leaved basil. Plants with a trailing habit can look like slimy tendrils or wispy spirits, especially when combined with a distressed planter. Think about plants that have a somewhat wild or untamed appearance, like ornamental grasses or plants with thorny stems, which can add an element of danger.
- Dark Foliage:
- Heuchera (Coral Bells) in deep burgundy or almost black varieties.
- Black Mondo Grass.
- Ornamental Peppers with dark red or black fruits.
- Certain varieties of Coleus with dark patterns.
- Spiky or Thorny Textures:
- Cacti and succulents with sharp spines.
- Yucca plants.
- Agave varieties.
- Trailing Plants:
- Creeping Jenny (especially darker varieties).
- Certain ivies with dark or variegated leaves.
- “Spooky” Plant Names/Associations:
- “Dragon’s Breath” ornamental pepper.
- “Black Bat Flower” (Tacca chantrieri) – though often challenging to find and grow.
- Plants commonly associated with witchcraft or folklore.
When selecting plants, consider their hardiness in your climate and the conditions they need to thrive. A plant that looks great but wilts quickly won’t contribute to the creepy aesthetic. For a truly ephemeral spooky effect, you could also temporarily place plastic plants or even fake flowers in unusual colors like deep purple or black.
What If Your Patio Became Your Favorite Spot This Fall?
Cooler evenings don’t have to send everyone indoors. Discover simple ways to turn your porch or patio into a warm, cozy place to gather after sunset.
Remember to also consider what’s inside the planter; perhaps a plastic skeleton hand reaching out from the soil, or a small plastic spider peeking from behind a dark leaf. This combination of real and artificial elements can be incredibly effective.
DIY Repurposed Material Planter Ideas
One of the most creative ways to make creepy planters is by repurposing materials that already have a sinister or aged look. This approach adds character and uniqueness that store-bought decorations simply can’t match. Think outside the traditional planter box and look for items that can be given a new, spooky life.
Old, cracked ceramic pots can be further distressed with paint and embellishments. However, consider more unconventional items too: an old metal colander can become a rusty, haunted cage; a weathered wooden crate can be transformed into a spooky coffin or crypt. Even discarded toys can be given a creepy twist.
Imagine a teddy bear with one eye missing, or a doll with cracked porcelain skin, emerging from a planter. These items tap into a childlike fear and add a disturbing element.
Repurposed Material Ideas
- Old Tires: Cut and painted, they can resemble monstrous mouths or dark portals.
- Buckets or Tubs: Weathered metal or plastic buckets can be painted to look like rusty torture devices or grave markers.
- Discarded Toys: Dolls, action figures, or even old toy cars can be painted and embedded into a planter for a haunting scene.
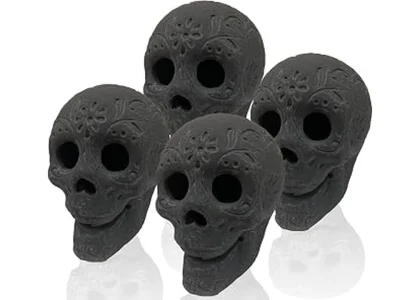
- Skull Decorations: Hollow plastic skulls can be used as planters themselves or as embellishments glued onto other containers.
- Gutter Sections: Long sections of old gutter can be cut and mounted to create elongated, eerie planting beds.
- Broken Pottery Shards: Use these to create mosaic-like patterns on a planter, or arrange them to look like they’re breaking out.
When repurposing items, always ensure they are clean and safe to handle. For materials that might degrade quickly outdoors, a good sealant is essential. Consider how the item naturally holds soil or if you’ll need to insert a smaller pot or a plastic liner inside.
What If Your Patio Became Your Favorite Spot This Fall?
Cooler evenings don’t have to send everyone indoors. Discover simple ways to turn your porch or patio into a warm, cozy place to gather after sunset.
For instance, if you’re using a plastic skull, you’ll likely need to place a smaller pot or bag of soil inside its hollow to plant in. These DIY projects are not only cost-effective but also offer endless creative possibilities for truly unique and terrifying Halloween decor.
Creating a Mini Halloween Scene with Planters
Your creepy planters don’t have to stand alone. They can be integrated into a larger Halloween scene, acting as focal points or supporting elements that enhance the overall spooky atmosphere. Think about how they can interact with other decorations or the natural elements of your yard.
Group several creepy planters together to create a small, haunted garden or a desolate graveyard vignette. You can place them around a larger prop, like a tombstone, a scarecrow, or a fog machine, to build a more immersive experience. Consider how lighting will affect your scene.
Uplighting from hidden sources can cast dramatic shadows, making your creepy planters appear even more menacing. String lights or flickering LED candles placed within or around the planters can add an ethereal glow.
Important: When creating a scene, ensure a cohesive theme. If one planter is a gothic tomb, try to keep the surrounding elements in a similar style rather than mixing too many disparate themes.
Consider the placement of your planters. A front porch is a classic spot, but don’t overlook a shadowy corner of the yard, a pathway leading to your door, or even a side garden. The element of surprise can add to the creepiness.
What If Your Patio Became Your Favorite Spot This Fall?
Cooler evenings don’t have to send everyone indoors. Discover simple ways to turn your porch or patio into a warm, cozy place to gather after sunset.
You can also integrate them with other Halloween elements like faux spiderwebs draped between planters, small plastic ghosts or bats clinging to the sides, or even a spooky sound effect playing nearby. This layering of visual and auditory cues will create a truly unforgettable Halloween display that captivates visitors.
Weatherproofing and Longevity for Your Creepy Planters
Creating your creepy planters is only half the battle; ensuring they withstand the elements and last throughout the Halloween season is crucial. Outdoor decor is exposed to rain, wind, temperature fluctuations, and sunlight, all of which can degrade your hard work.
The first step to weatherproofing is choosing appropriate materials. If you’re painting, opt for exterior-grade paints designed for the material of your planter (terra cotta, plastic, metal). Acrylic paints are often suitable for plastic and terra cotta, but always check the manufacturer’s recommendations.
For wood or metal, consider spray paints specifically formulated for outdoor use. After painting, applying a clear, matte, or satin finish sealant is highly recommended. This acts as a protective barrier against moisture and UV rays, preventing chipping, fading, and peeling.
| Material | Recommended Sealant | Application Tips |
|---|---|---|
| Terra Cotta/Ceramic | Clear Acrylic Sealer (Matte or Satin) | Apply 2-3 thin coats after paint is fully dry. Ensure good ventilation. |
| Plastic/Resin | Spray Sealant for Plastic (UV resistant) | Light sanding can help paint and sealant adhere better. |
| Metal | Clear Metal Sealer or Exterior Varnish | Use rust-inhibiting primer before painting if needed. |
| Wood | Exterior Wood Varnish or Deck Sealer | Apply multiple coats, especially to end grains. |
For repurposed materials that aren’t naturally weatherproof, consider using them primarily for indoor Halloween displays or bring them inside during inclement weather. If you’re using fabric elements like fake cobwebs, these will degrade over time, especially with moisture and wind. Plan to replenish them as needed throughout the season.
For any embellishments attached with glue, a strong, weather-resistant adhesive is vital. Regularly inspect your planters for any signs of damage or wear, and touch up as necessary to keep them looking their spooky best.
What If Your Patio Became Your Favorite Spot This Fall?
Cooler evenings don’t have to send everyone indoors. Discover simple ways to turn your porch or patio into a warm, cozy place to gather after sunset.
Frequently Asked Questions
What type of paint is best for decorating outdoor planters for Halloween?
Exterior-grade acrylic paints are generally the best choice for most planter materials like terra cotta, ceramic, and plastic. For metal or wood, consider specialized outdoor spray paints or varnishes. Always ensure the paint is durable and weather-resistant.
How can I make my painted planter look old and spooky?
To achieve an aged, spooky look, use distressing techniques. This can involve dry-brushing lighter colors over a dark base, sanding edges to reveal the underlying material, or applying a wash of dark gray or black paint and then wiping it off while wet to create a grimy effect.
Can I use real plants in my creepy Halloween planters?
Absolutely! Choosing plants with dark foliage, spiky textures, or unusual shapes can significantly enhance the creepy aesthetic. Consider dark-leaved Heuchera, ornamental peppers, or even thorny succulents to complement your spooky planter design.
What is the best way to attach embellishments like spiders and cobwebs?
For secure attachment, especially outdoors, use a strong adhesive like hot glue or a heavy-duty craft glue like E6000. For cobwebs, stretch them thinly and secure the edges with small pieces of tape or dots of glue. Ensure all attached items are firmly fixed to withstand wind and rain.
How do I protect my creepy planters from rain and sun damage?
A good quality clear sealant, preferably with UV protection, is essential. Apply 2-3 thin coats over your painted and embellished surfaces. This protective layer will prevent paint from chipping, colors from fading, and materials from degrading due to weather exposure.
Final Thoughts
Transforming ordinary planters into creepy Halloween decorations is a rewarding DIY project that adds significant festive flair to your home. By focusing on strategic painting, tactile embellishments, spooky plant choices, and creative repurposing, you can craft truly unique and unsettling pieces. Remember to weatherproof your creations to ensure they maintain their frightening appearance throughout the season, making your home the most spooktacular on the block.
What If Your Patio Became Your Favorite Spot This Fall?
Cooler evenings don’t have to send everyone indoors. Discover simple ways to turn your porch or patio into a warm, cozy place to gather after sunset.