Last Updated on October 22, 2026 by D. Ruddy
If you’ve ever wanted to enjoy the taste of fresh, homegrown tomatoes, growing tomatoes is easier than you think. This guide covers everything you need to know, from selecting the right varieties to troubleshooting common problems. Whether you have a spacious garden or just a sunny balcony, you can grow juicy, flavorful tomatoes with the right approach.
You can grow tomatoes successfully by choosing the right variety for your climate, providing consistent water and sunlight, and using well-draining soil. Most beginners see their first harvest within 60-85 days.
Choosing the Best Tomato Varieties for Your Garden
The first step in growing tomatoes is picking the right type for your space and needs. There are two main categories: determinate and indeterminate. Determinate tomatoes grow to a certain size and produce fruit all at once, making them ideal for container gardening.
Indeterminate varieties keep growing and producing fruit throughout the season, perfect for garden beds with trellises.
Here are some popular varieties to consider:
- Cherry Tomatoes: Small, sweet, and prolific. Great for salads and snacking. Varieties include Sweet 100, Sun Gold, and Tiny Tim.
- Beefsteak Tomatoes: Large, meaty tomatoes perfect for sandwiches and burgers. Try Brandywine or Big Beef.
- Roma Tomatoes: Oval-shaped and meaty with fewer seeds, ideal for sauces and paste. San Marzano is a classic choice.
- Heirloom Tomatoes: Unique colors and flavors, often organic. Varieties like Cherokee Purple and Green Zebra add visual appeal.
- Patio Tomatoes: Compact plants perfect for containers. Tumbling Tom and Tiny Tim are excellent options.
According to the University of California Agriculture & Natural Resources, indeterminate varieties can grow up to 12 feet tall under ideal conditions, while determinate varieties typically stay under 4 feet.
| Variety | Type | Days to Maturity | Best For |
|---|---|---|---|
| Sweet 100 | Indeterminate | 65-70 | Snacking, Salads |
| Brandywine | Indeterminate | 80-90 | Sandwiches, Slicing |
| San Marzano | Indeterminate | 80-90 | Sauces, Paste |
| Tiny Tim | Determinate | 55-60 | Containers, Small Spaces |
When selecting varieties, consider your climate. Heat-tolerant varieties like Solar Fire and Heatmaster thrive in hot regions, while cooler climates may benefit from early-maturing types like Stupice or Glacier.
Tip: Start with disease-resistant varieties marked with codes like VF (Verticillium and Fusarium wilt resistant) or N (Nematode resistant) to avoid common issues.
Starting Tomato Plants from Seeds vs Transplants
You have two main options when growing tomatoes: starting from seeds or using transplants. Each approach has its advantages, and the best choice depends on your timeline, budget, and experience level.
Starting from seeds gives you access to a wider variety of tomato types, including heirlooms that may not be available as transplants. It’s also more cost-effective if you plan to grow many plants. However, it requires more time and care, as seeds need consistent warmth and moisture to germinate.
Transplants, on the other hand, offer a head start. These young plants are already several weeks old when you plant them, which means you’ll get fruit sooner. They’re ideal for beginners or those with shorter growing seasons.
According to the USDA, transplants can reduce the time to harvest by 4-6 weeks compared to direct-seeded plants.
Starting from Seeds
If you choose to start from seeds, begin indoors 6-8 weeks before your last expected frost date. Use seed-starting trays with a well-draining seed mix. Keep the soil warm (70-80°F) and moist.
Seeds typically germinate in 5-10 days.
- Prepare trays: Fill seed trays with moist seed-starting mix.
- Plant seeds: Sow seeds ¼ inch deep, 1-2 per cell.
- Provide warmth: Use a heat mat or place trays in a warm spot.
- Ensure light: Once sprouted, move to a sunny window or under grow lights for 14-16 hours daily.
- Harden off: 1-2 weeks before transplanting, gradually expose seedlings to outdoor conditions.
- Transplant: Move to the garden after all danger of frost has passed.
Using Transplants
When buying transplants, look for stocky, healthy plants with no flowers or fruit yet. Avoid leggy or yellowing plants, as these may struggle to adapt. Plant transplants deeper than they were in their containers—bury up to two-thirds of the stem.
This encourages a stronger root system.
- Inspect plants: Check for pests or diseases before buying.
- Choose the right size: Select plants that are 6-10 inches tall with thick stems.
- Plant deep: Bury part of the stem to promote root growth.
- Water well: Give transplants a thorough watering after planting.
- Provide support: Install cages or stakes at planting time to avoid disturbing roots later.
Warning: Avoid planting tomatoes where other nightshade plants (peppers, potatoes, eggplants) have grown in the past 3 years to prevent disease buildup.
Essential Growing Conditions for Healthy Tomatoes
Tomatoes thrive under specific conditions, and meeting these requirements is key to a successful harvest. The most critical factors are sunlight, water, soil, and temperature.
Tomatoes need at least 6-8 hours of direct sunlight daily. More is better—10 hours can significantly boost yields. If your garden doesn’t get enough sun, consider using containers that you can move to sunnier spots throughout the day.
Consistent moisture is crucial. Tomatoes need about 1-2 inches of water per week, either from rainfall or irrigation. Water deeply and infrequently rather than shallowly and often.
This encourages deep root growth. The best time to water is early in the morning to allow foliage to dry before evening, reducing disease risk.
Soil Requirements
Tomatoes prefer well-draining, fertile soil with a pH between 6.0 and 6.8. Sandy loam is ideal, but you can improve any soil with organic matter. Work in plenty of compost or aged manure before planting.
A soil test can help you determine if you need to adjust the pH or add specific nutrients.
- pH Level: 6.0-6.8 (slightly acidic)
- Soil Type: Well-draining loam
- Organic Matter: Add compost or aged manure
- Drainage: Avoid waterlogged soil
- Fertility: Rich in nitrogen, phosphorus, and potassium
Temperature and Humidity
Tomatoes are warm-season plants. They won’t tolerate frost and grow best when daytime temperatures are between 70-85°F and nighttime temperatures are above 55°F. If your area has cool nights, consider using row covers or cloches to keep plants warm.
High humidity can increase the risk of fungal diseases. Ensure good air circulation around plants by spacing them properly and pruning excess foliage. According to the University of Florida IFAS Extension, ideal humidity levels for tomatoes are between 40-70%.
| Factor | Ideal Range | Notes |
|---|---|---|
| Sunlight | 6-10 hours daily | More sunlight = higher yields |
| Water | 1-2 inches per week | Water deeply and infrequently |
| Soil pH | 6.0-6.8 | Slightly acidic is best |
| Temperature | 70-85°F day, 55°F+ night | Use covers for cool nights |
Planting Tomatoes Step by Step
Once you’ve selected your varieties and prepared your soil, it’s time to plant. Whether you’re using seeds or transplants, proper planting techniques set the stage for healthy growth and abundant fruit.
When to Plant
Timing is everything. Plant tomatoes outdoors only after all danger of frost has passed and soil temperatures have warmed to at least 60°F. In most regions, this means planting 2-3 weeks after your last expected frost date.
For fall crops in warm climates, plant 10-12 weeks before your first expected frost.
You can check your local frost dates using resources like the Old Farmer’s Almanac or your nearest agricultural extension office.
How to Plant Transplants
- Dig holes: Make holes about 12-18 inches deep and 12-24 inches apart for determinate varieties, or 18-24 inches apart for indeterminate varieties.
- Amend soil: Mix a handful of compost or a balanced fertilizer into the bottom of each hole.
- Remove lower leaves: Pinch off the lower leaves of the transplant, leaving only the top few.
- Plant deep: Place the plant in the hole so that about two-thirds of the stem is buried. Roots will grow along the buried stem.
- Water well: Give each plant a thorough watering to settle the soil around the roots.
- Add mulch: Spread a 2-3 inch layer of mulch around each plant to retain moisture and suppress weeds.
- Install support: Set up cages, stakes, or trellises at planting time to avoid disturbing roots later.
Spacing Guidelines
Proper spacing is crucial for air circulation and disease prevention. Crowded plants are more susceptible to fungal diseases and produce lower yields. Here’s a quick guide:
- Determinate (bush) varieties: 12-24 inches apart in rows 36 inches apart
- Indeterminate (vining) varieties: 18-24 inches apart in rows 36-48 inches apart
- Staked indeterminate: 12-18 inches apart
- Caged indeterminate: 18-24 inches apart
- Container plants: One plant per 5-gallon container
Tip: Plant tomatoes in blocks rather than single rows to improve pollination and yield. This layout also makes it easier to install drip irrigation.
Watering Tomatoes the Right Way
Watering is one of the most critical aspects of growing tomatoes. Inconsistent watering leads to problems like blossom end rot, cracking, and poor fruit quality. The key is to maintain consistent soil moisture without overwatering.
Tomatoes need about 1-2 inches of water per week. This includes rainfall, so adjust your watering schedule based on the weather. Sandy soils may need more frequent watering, while clay soils hold moisture longer.
The best way to check is to stick your finger about 2 inches into the soil—if it feels dry, it’s time to water.
Best Watering Practices
- Water deeply: Each watering should moisten the soil to a depth of at least 6-8 inches. This encourages deep root growth.
- Water at the base: Always water at the base of the plant, not the leaves. Wet foliage increases the risk of fungal diseases.
- Morning watering: Water early in the day so foliage has time to dry before evening.
- Use drip irrigation: Drip systems deliver water directly to the roots and are the most efficient method.
- Avoid overhead watering: Sprinklers can wet the leaves and spread disease.
- Mulch heavily: A 2-3 inch layer of organic mulch (straw, wood chips, or leaves) helps retain moisture and keeps soil temperatures stable.
Signs of Overwatering and Underwatering
Both overwatering and underwatering can stress your plants and reduce yields. Here’s how to spot the signs:
| Issue | Symptoms | Solution |
|---|---|---|
| Overwatering | Yellowing leaves, wilted appearance, mold or fungus, root rot | Reduce watering, improve drainage, check for root rot |
| Underwatering | Drooping leaves, dry soil, leaf curl, blossom end rot | Water deeply and regularly, add mulch |
According to a study by the University of Arizona, inconsistent watering is the leading cause of blossom end rot in tomatoes, affecting up to 30% of homegrown crops in arid regions.
Fertilizing Tomatoes for Maximum Yield
Tomatoes are heavy feeders and need regular fertilization to produce abundant, flavorful fruit. The right nutrients at the right time make a big difference in plant health and productivity.
At planting time, mix a balanced fertilizer (10-10-10) or plenty of compost into the soil. Once the plants start to flower, switch to a fertilizer higher in phosphorus and potassium (like 5-10-10 or 3-4-6) to support fruit development. Avoid over-fertilizing with nitrogen, as this can lead to lots of leafy growth but few tomatoes.
Organic vs Synthetic Fertilizers
Both organic and synthetic fertilizers can work well for tomatoes. Organic options like compost, worm castings, fish emulsion, and seaweed extracts improve soil health over time. Synthetic fertilizers provide nutrients quickly and can be more precise for addressing specific deficiencies.
| Fertilizer Type | Pros | Cons |
|---|---|---|
| Compost | Improves soil structure, slow-release nutrients, eco-friendly | Nutrient content varies, slower results |
| Fish Emulsion | High in nitrogen, fast-acting, organic | Strong odor, can attract pests |
| Balanced Synthetic (10-10-10) | Precise nutrient ratios, fast results | Can leach into waterways, may harm soil microbes |
| Tomato-Specific (5-10-10) | Tailored for tomato needs, promotes fruiting | More expensive, can burn roots if overused |
Fertilizing Schedule
- At planting: Mix compost or a balanced fertilizer into the soil.
- When plants are 1 foot tall: Apply a nitrogen-rich fertilizer to promote leaf growth.
- When flowers appear: Switch to a phosphorus-rich fertilizer to support fruiting.
- Every 2-3 weeks: Continue with a balanced or tomato-specific fertilizer throughout the growing season.
- When fruit sets: Reduce nitrogen to focus on fruit production.
Important: Always follow the manufacturer’s instructions for application rates. Too much fertilizer can damage plants and lead to poor fruit quality.
Pruning and Supporting Tomato Plants
Proper pruning and support are essential for healthy tomato plants, especially indeterminate varieties. These practices improve air circulation, reduce disease risk, and direct the plant’s energy toward fruit production.
Indeterminate tomatoes benefit from regular pruning to remove suckers—the small shoots that grow in the crotch between the main stem and a branch. These suckers won’t produce fruit and only sap energy from the plant. Determinate tomatoes, on the other hand, generally don’t need pruning, as this can reduce your overall yield.
How to Prune Tomato Plants
- Identify suckers: Look for small shoots growing between the main stem and branches.
- Remove small suckers: For suckers less than 3 inches long, simply pinch them off with your fingers.
- Prune larger suckers: For bigger suckers, use clean pruning shears to avoid tearing the plant.
- Remove lower leaves: Trim leaves that touch the ground to prevent soil-borne diseases.
- Prune regularly: Check plants every 1-2 weeks and remove new suckers as they appear.
Supporting Tomato Plants
Tomato plants need support to keep fruit off the ground, prevent disease, and make harvesting easier. There are several support options, each with its own advantages:
- Cages: Wire cages are easy to use and provide good support for determinate varieties. Choose cages at least 5 feet tall for indeterminate types.
- Stakes: Wooden or bamboo stakes are inexpensive and work well for small plants. Tie the main stem to the stake with soft cloth or plant ties as it grows.
- Trellises: Trellises are ideal for indeterminate varieties. Train the main stem up the trellis and prune side branches.
- Florida Weave: This system uses stakes and twine to create a weaving support between plants. It’s great for large plantings.
- Hanging Baskets: Perfect for cherry tomatoes. The plants cascade over the sides, and fruit hangs down for easy picking.
| Support Type | Best For | Pros | Cons |
|---|---|---|---|
| Cages | Determinate varieties | Easy to use, no tying required | Can topple over, may not support large indeterminate plants |
| Stakes | Small plants, containers | Inexpensive, space-efficient | Requires regular tying, can be unstable |
| Trellises | Indeterminate varieties | Maximizes space, good air circulation | Requires pruning, more labor-intensive |
Common Tomato Pests and Diseases
Even with the best care, tomatoes can fall victim to pests and diseases. Recognizing and addressing these issues early is key to protecting your crop. Prevention is always better than cure, so start with healthy plants and good cultural practices.
According to the USDA, tomato plants can be affected by over 200 different pests and diseases. The most common issues include fungal diseases, bacterial infections, viral diseases, and insect pests. Many of these problems can be prevented with proper watering, good air circulation, and crop rotation.
Common Tomato Pests
- Aphids: Small, green or black insects that cluster on new growth and undersides of leaves. They suck plant sap and can spread viruses.
- Tomato Hornworms: Large, green caterpillars with white stripes. They can defoliate plants quickly and even eat the fruit.
- Whiteflies: Tiny, white flying insects found on the undersides of leaves. They cause yellowing and can transmit viruses.
- Flea Beetles: Small, black or brown beetles that chew tiny holes in leaves. They’re most active in early spring.
- Spider Mites: Tiny red or yellow mites that cause stippling on leaves. They thrive in hot, dry conditions.
| Pest | Signs | Prevention/Treatment |
|---|---|---|
| Aphids | Curled leaves, sticky residue (honeydew), black sooty mold | Spray with water, introduce ladybugs, use insecticidal soap |
| Hornworms | Missing leaves, chewed fruit, large caterpillars | Handpick, use BT (Bacillus thuringiensis), attract parasitic wasps |
| Whiteflies | Yellowing leaves, sticky residue, tiny white flies | Use yellow sticky traps, introduce lacewings, apply neem oil |
Common Tomato Diseases
- Early Blight: Causes brown spots with concentric rings on lower leaves. Spreads upward and can defoliate plants.
- Late Blight: Causes large, irregular brown spots on leaves and fruit. Can destroy plants quickly, especially in wet weather.
- Blossom End Rot: Causes dark, sunken spots on the bottom of fruit. Caused by calcium deficiency and inconsistent watering.
- Fusarium Wilt: Causes yellowing and wilting of leaves, often on one side of the plant. The fungus lives in the soil.
- Verticillium Wilt: Similar to Fusarium wilt but affects both sides of the plant. Leaves turn yellow and drop off.
Warning: Remove and destroy any plants showing signs of viral diseases (like mosaic virus) immediately. Do not compost them, as this can spread the disease.
Preventing Pests and Diseases
Prevention is the best strategy for keeping your tomatoes healthy. Here are some key practices:
- Crop Rotation: Don’t plant tomatoes or other nightshades in the same spot more than once every 3-4 years.
- Good Air Circulation: Space plants properly and prune excess foliage to improve airflow.
- Water at the Base: Keep leaves dry to reduce fungal disease risk.
- Use Mulch: Mulch suppresses weeds, retains moisture, and prevents soil from splashing onto leaves.
- Clean Up: Remove and destroy any diseased plants or fallen leaves.
- Choose Resistant Varieties: Look for varieties labeled with disease resistance codes (e.g., VFNT).
- Inspect Regularly: Check plants often for signs of pests or diseases so you can act quickly.
Harvesting and Storing Tomatoes
Knowing when and how to harvest your tomatoes ensures the best flavor and quality. Tomatoes ripen from the inside out, so color is the best indicator of ripeness. However, there are a few other signs to look for as well.
A ripe tomato will be fully colored and slightly soft to the touch. It should come off the vine easily when gently twisted. If you’re growing heirloom varieties, note that their colors can vary widely—some may be green, purple, or even striped when ripe.
When to Harvest
Harvest tomatoes when they reach their full color and are slightly soft. For the best flavor, pick tomatoes when they’re fully ripe. However, if you’re expecting frost or have a surplus, you can harvest mature green tomatoes and ripen them indoors.
- Fully ripe: Best flavor, ready to eat immediately
- Breaker stage: Color change has started, will ripen indoors in 1-2 weeks
- Mature green: Full size but still green, will ripen indoors in 2-3 weeks
How to Harvest
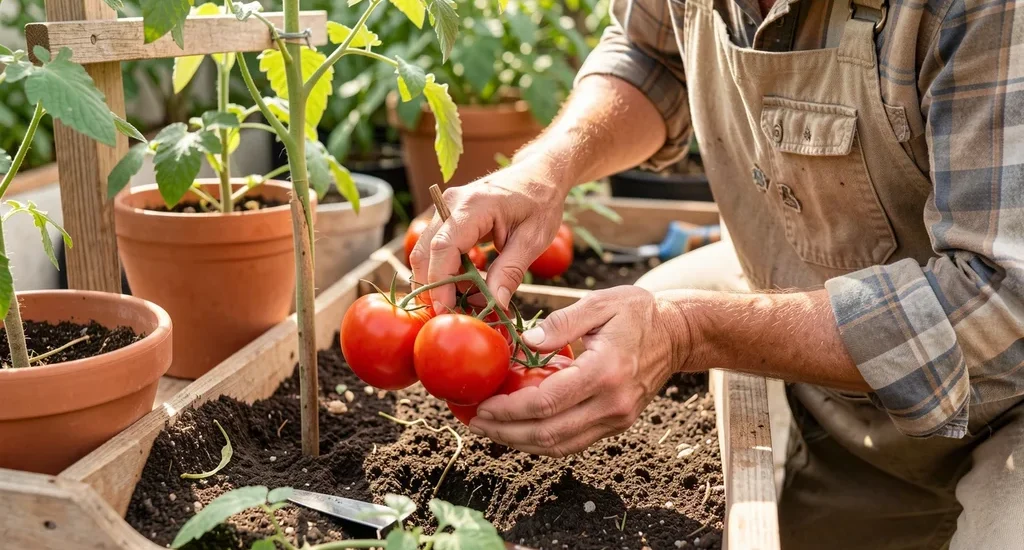
- Use two hands: Hold the vine with one hand and the tomato with the other.
- Twist gently: Rotate the tomato until it breaks free from the vine.
- Avoid pulling: Don’t yank the tomato, as this can damage the plant.
- Harvest regularly: Pick tomatoes every few days to encourage more production.
- Use pruners for stubborn fruit: If a tomato won’t come off easily, use clean pruners to avoid damaging the plant.
Tip: Harvest tomatoes in the morning when they’re cool. This helps them last longer in storage.
Storing Tomatoes
Tomatoes are best enjoyed fresh, but there are ways to store them for later use. Never refrigerate fresh tomatoes unless they’re fully ripe—cold temperatures can ruin their flavor and texture. Instead, store them at room temperature, out of direct sunlight.
- Countertop: Store ripe tomatoes stem-side down on the counter. They’ll keep for 3-5 days.
- Paper bag: Place partially ripe tomatoes in a paper bag with an apple or banana to speed up ripening.
- Freezing: Wash and dry tomatoes, then freeze whole on a tray before transferring to a bag. Use in cooked dishes.
- Canning: Preserve tomatoes by canning them as sauce, juice, or whole tomatoes.
- Drying: Sun-dry or use a dehydrator to make dried tomatoes for later use.
Frequently Asked Questions
How long does it take to grow tomatoes from seed?
Tomatoes typically take 60-85 days to mature from seed, depending on the variety. Early-maturing varieties may be ready in as little as 50-60 days, while some large heirloom types can take up to 90 days. Starting seeds indoors 6-8 weeks before your last frost date gives plants a head start.
Can I grow tomatoes in containers?
Yes, many tomato varieties grow well in containers. Choose determinate or compact indeterminate varieties like Patio, Tiny Tim, or Bush Early Girl. Use a container that’s at least 5 gallons in size with good drainage.
Ensure the container gets at least 6-8 hours of sunlight daily.
Why are my tomato leaves turning yellow?
Yellow leaves can indicate several issues, including overwatering, underwatering, nutrient deficiencies, or diseases. Check the soil moisture and your watering schedule first. If the soil is too wet or too dry, adjust accordingly.
If the issue persists, consider testing the soil for nutrient deficiencies or inspect the plant for signs of disease.
How do I prevent blossom end rot?
Blossom end rot is caused by a calcium deficiency, often due to inconsistent watering. To prevent it, maintain consistent soil moisture and add calcium to the soil. Crushed eggshells, lime, or a calcium-rich fertilizer can help.
Mulching also helps keep soil moisture levels stable.
What’s the best way to save tomato seeds?
To save tomato seeds, select fully ripe, healthy fruit from your best plants. Scoop out the seeds and gel, then place them in a jar with a little water. Let the mixture ferment for 2-5 days, stirring daily.
Rinse the seeds, then dry them on a paper towel before storing in a cool, dry place.
Final Thoughts
Growing tomatoes is a rewarding experience that yields delicious, fresh produce for your kitchen. By choosing the right varieties, providing proper care, and addressing issues promptly, you can enjoy a bountiful harvest. Remember to start with healthy plants, maintain consistent watering and fertilizing, and support your plants as they grow.
With a little patience and attention, you’ll be enjoying homegrown tomatoes in no time.