Last Updated on July 12, 2026 by D. Ruddy
Drip irrigation delivers water directly to the soil at each plant\’s base. No evaporation. No spray on leaves. No water wasted on weeds. Here is how to set up a system from scratch.
What You Need
A basic drip system needs:
- Pressure regulator (reduces house pressure to 15-30 PSI)
- Filter (prevents clogged emitters)
- 1/2-inch distribution tubing (main line)
- 1/4-inch drip line (branches to plants)
- Emitters or drippers (controlled water release)
- Fittings and connectors
- Stakes (hold tubing in place)
- Hole punch tool
- Timer (automates watering)
Buy a kit for simplicity or individual components for flexibility.
Step 1: Plan Your Layout
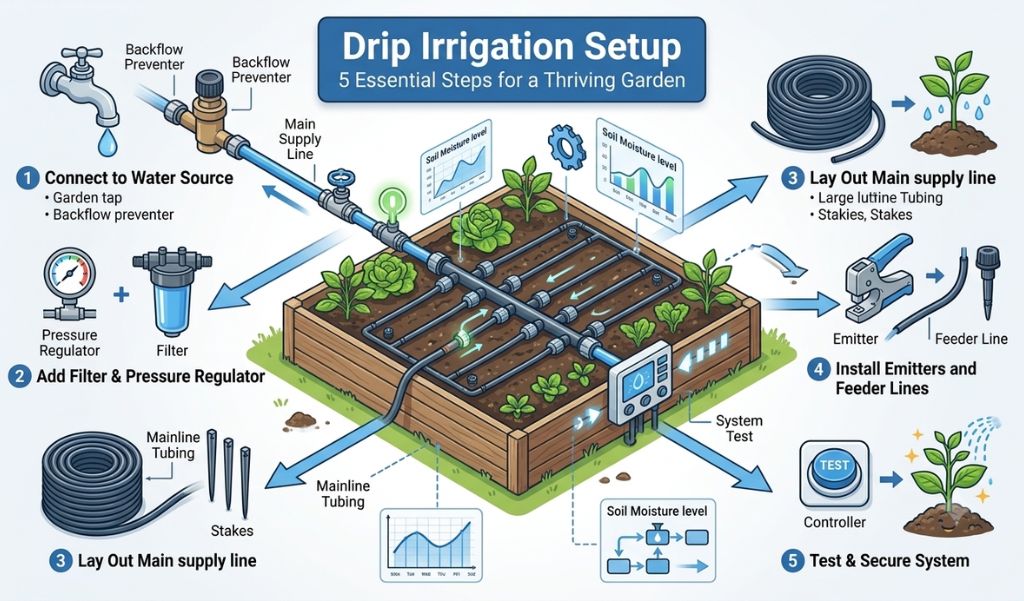
Sketch your garden bed. Mark each plant. Group by water needs. Thirsty plants (tomatoes, hydrangeas) need more. Drought-tolerant plants (lavender, succulents) need less. Put them on separate lines or zones.
🍂 The Silent Lawn Killer: Damp Leaves Will Suffocate Your Grass
Trapped wet leaves create a breeding ground for destructive snow mold. Clear the yard fast with a high-power cordless blower before the ground freezes.
Plan the 1/2-inch main tubing route along the bed edge or center. Plan 1/4-inch branch lines to each plant. Keep branches under 10 feet or pressure drops.
Choose emitter types: individual drippers for spaced plants, drip line with built-in emitters (every 6-12 inches) for vegetable rows, micro bubblers for shrubs, soaker hose for dense ground cover.
Step 2: Connect to the Water Source
Most systems connect to an outdoor spigot. Screw on the pressure regulator first, then the filter, then a backflow preventer (if not built in), then the timer, then the 1/2-inch tubing using a hose-to-tubing adapter.
To tap into an in-ground sprinkler zone, use a conversion kit that replaces a sprinkler head with a drip manifold.
Step 3: Run the Main Tubing
Lay the 1/2-inch tubing along your planned route. Cold tubing is stiff — lay it in the sun for 30 minutes first. Use stakes every 3-4 feet. Leave everything on the surface until you test and adjust. Install a flush valve or figure-8 end cap at the end so you can flush debris.
Step 4: Install Emitters and Branch Lines
Punch holes with the proper tool — not a nail or screwdriver, which cause leaks. Insert a barbed connector, attach 1/4-inch drip line, run it to the plant, and stake the emitter 2-4 inches from the stem. For plants right along the main line, punch and push the emitter directly in.
🍂 The Silent Lawn Killer: Damp Leaves Will Suffocate Your Grass
Trapped wet leaves create a breeding ground for destructive snow mold. Clear the yard fast with a high-power cordless blower before the ground freezes.
Match flow rates: 0.5 GPH for small plants, 1 GPH for medium, 2 GPH for large shrubs. Use multiple emitters per plant instead of a higher flow rate.
Step 5: Test the System
Turn on water slowly. Check every connection for leaks. Confirm every emitter drips. Emitters at the far end should match the flow of those near the source. If not, you have too many on one line or low pressure — split into zones or use pressure-compensating emitters.
Run the full watering cycle. Check soil moisture depth: 6-8 inches for vegetables, 12-18 inches for shrubs. Adjust run time until you hit the right depth.
Step 6: Cover and Secure
Cover tubing with 2-3 inches of mulch. Keep emitters visible until you confirm placement is right, then push them slightly under. In cold climates, drain the system before winter — open the end cap, remove the timer and filter, and store them inside.
Maintenance
Flush lines monthly by opening the end cap for a minute. Check emitters regularly — a clogged emitter means a dead plant if missed. Clean the filter every month. Replace it annually.