Last Updated on October 22, 2026 by D. Ruddy
If you want to add fresh, flavorful garlic to your kitchen, how to grow garlic is simpler than you think. This guide covers everything from planting to harvesting so you can enjoy homegrown bulbs packed with flavor. Garlic thrives in most climates with minimal care, making it a rewarding crop for beginners and seasoned gardeners alike.
You can grow garlic by planting individual cloves in well-drained soil during fall or early spring. Space them 4-6 inches apart, water moderately, and harvest when the lower leaves brown. This method yields fresh bulbs in about 90 days with minimal effort.
What You Need to Grow Garlic
Before planting, gather the right supplies to ensure success. Start with high-quality garlic bulbs from a nursery or garden center, as grocery store garlic may carry diseases. Choose a sunny spot in your garden with at least 6-8 hours of direct sunlight daily.
Garlic prefers loose, well-draining soil with a pH between 6.0 and 7.0. If your soil is heavy clay, amend it with compost or sand to improve drainage. You’ll also need a garden fork or trowel for planting, mulch to retain moisture, and a balanced fertilizer to boost growth.
- High-quality garlic bulbs (hardneck or softneck varieties)
- Sunny garden location with 6-8 hours of sunlight
- Loose, well-draining soil (pH 6.0-7.0)
- Compost or organic matter for soil amendment
- Garden fork or trowel for planting
- Mulch (straw or leaves) to retain moisture
- Balanced fertilizer (10-10-10 or organic alternative)
Choosing the Right Garlic Variety
Not all garlic is the same. The two main types—hardneck and softneck—have distinct flavors, growing habits, and storage lives. Hardneck garlic produces a flower stalk (scape) and has larger cloves, while softneck garlic stores longer and is easier to braid.
Hardneck varieties like Rocambole and Purple Stripe thrive in colder climates and offer bold, complex flavors. Softneck types such as Silverskin and Artichoke do well in warmer regions and are the kind you typically find in grocery stores. Choose based on your climate and taste preferences.
| Variety | Type | Flavor | Climate | Storage Life |
|---|---|---|---|---|
| Rocambole | Hardneck | Bold, spicy | Cold | 4-6 months |
| Purple Stripe | Hardneck | Rich, complex | Cold to temperate | 5-7 months |
| Silverskin | Softneck | Mild, sweet | Warm | 8-12 months |
| Artichoke | Softneck | Mild, versatile | Warm to temperate | 7-10 months |
Hardneck varieties are ideal for colder climates and produce scapes, while softneck types are better for storage and warmer regions.
Best Time to Plant Garlic
Timing is crucial for growing garlic. In most regions, the best time to plant is in the fall, about 4-6 weeks before the ground freezes. This allows cloves to develop roots before winter dormancy.
In warmer climates, you can plant in early spring as soon as the soil is workable.
Fall planting gives garlic a head start, as cloves establish roots before winter and resume growth in early spring. Spring planting works in areas with mild winters but may result in smaller bulbs. Aim for soil temperatures between 50-60°F (10-15°C) at planting time for optimal root development.
Tip: Plant garlic after the first frost but before the ground freezes for the best results in cold climates.
- Northern climates: Plant in late September to October, 4-6 weeks before the ground freezes.
- Southern climates: Plant in late February to March, as soon as soil is workable.
- Mild climates: Plant in late fall or early winter for a spring harvest.
Step by Step How to Plant Garlic
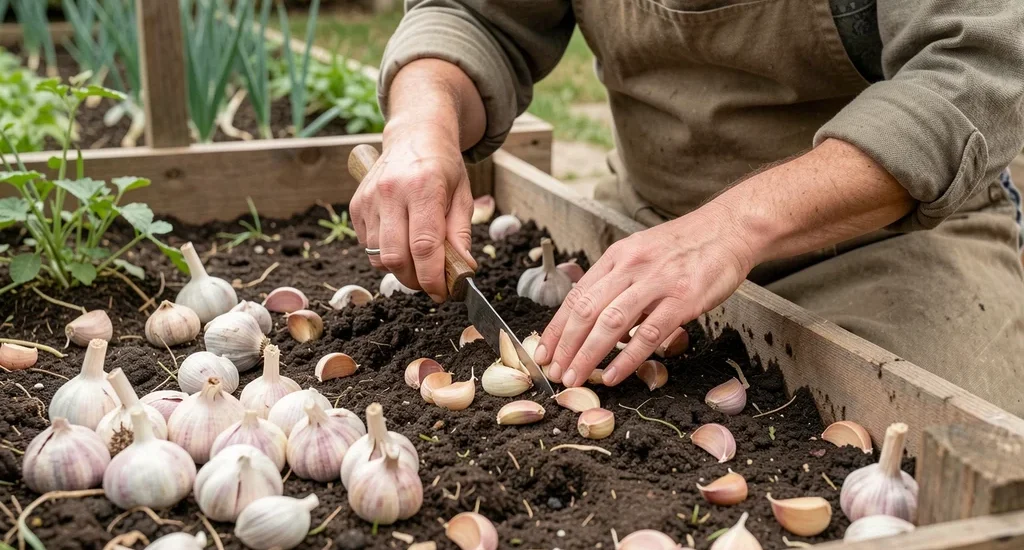
Planting garlic correctly sets the stage for healthy growth and a bountiful harvest. Start by breaking apart garlic bulbs into individual cloves, keeping the papery skin intact. Choose the largest, healthiest cloves for planting, as they’ll produce the biggest bulbs.
Plant cloves pointy-end up, about 2 inches deep into the soil. Space them 4-6 inches apart in rows that are 12 inches apart. This spacing gives each plant enough room to grow without competition.
After planting, cover the bed with 4-6 inches of mulch to insulate the soil and retain moisture.
- Prepare the soil: Loosen the soil to a depth of 12 inches and mix in compost or well-rotted manure.
- Separate cloves: Gently break apart bulbs into individual cloves, keeping the skin on.
- Plant cloves: Place cloves 2 inches deep, pointy-end up, 4-6 inches apart.
- Cover with soil: Fill the holes and gently pat the soil to remove air pockets.
- Add mulch: Spread 4-6 inches of straw or leaves over the bed to protect cloves.
- Water lightly: Moisten the soil without soaking it to avoid rot.
Warning: Never plant garlic cloves from the grocery store, as they may carry diseases or be treated to prevent sprouting.
Garlic Care and Maintenance
Garlic is a low-maintenance crop, but proper care ensures strong growth and large bulbs. Water plants regularly during the growing season, keeping the soil consistently moist but not waterlogged. Reduce watering as the plants mature and the leaves begin to yellow.
Fertilize garlic lightly with a balanced fertilizer (10-10-10) or compost tea every 2-3 weeks during the growing season. Avoid high-nitrogen fertilizers, as they can promote leafy growth at the expense of bulb development. Remove any weeds that compete for nutrients and water.
- Watering: Keep soil moist but not soggy; reduce watering as plants mature.
- Fertilizing: Apply balanced fertilizer or compost tea every 2-3 weeks.
- Weeding: Remove weeds regularly to prevent competition for nutrients.
- Mulching: Maintain mulch to retain moisture and suppress weeds.
- Pest control: Monitor for pests like aphids or onion thrips; use organic sprays if needed.
| Task | Frequency | Notes |
|---|---|---|
| Watering | Weekly | Reduce as plants mature |
| Fertilizing | Every 2-3 weeks | Use balanced fertilizer |
| Weeding | As needed | Keep bed weed-free |
Consistent care leads to healthier plants and larger bulbs at harvest time.
Managing Garlic Scapes
If you’re growing hardneck garlic, you’ll notice curly flower stalks called scapes emerging in late spring or early summer. These should be removed to encourage bulb growth. Scapes are edible and can be used in cooking, adding a mild garlic flavor to dishes.
To remove scapes, wait until they form a full curl or loop, then cut them off just above the top leaves. This redirects the plant’s energy toward bulb development. Removing scapes can increase bulb size by up to 25%.
- When to remove: Cut scapes when they form a full curl or loop.
- How to cut: Use clean scissors or pruners to snip just above the top leaves.
- Uses for scapes: Chop and use in pesto, stir-fries, or grilled dishes.
- Benefits: Removing scapes boosts bulb size and improves storage life.
Important: Always remove scapes from hardneck garlic to maximize bulb size and quality.
Common Mistakes to Avoid
Even experienced gardeners can make mistakes when growing garlic. One common error is planting cloves too shallow, which can lead to poor root development. Another is overwatering, which causes rot.
Avoid these pitfalls to ensure a successful harvest.
Planting grocery store garlic is another mistake, as it may be treated with growth inhibitors or carry diseases. Always source cloves from a reputable nursery or garden center. Additionally, neglecting to remove scapes from hardneck varieties can result in smaller bulbs.
- Planting too shallow: Cloves need to be 2 inches deep for proper root growth.
- Overwatering: Garlic prefers moist but not soggy soil; too much water causes rot.
- Using grocery store garlic: These cloves may be treated or diseased; always use seed garlic.
- Ignoring scapes: Failing to remove scapes reduces bulb size in hardneck varieties.
- Planting at the wrong time: Fall planting is best for most regions; spring planting may yield smaller bulbs.
How to Harvest Garlic
Garlic is ready to harvest when the lower leaves turn brown and the upper leaves remain green. This usually occurs in late spring or early summer, depending on your planting time and climate. Dig carefully to avoid damaging the bulbs, using a garden fork to loosen the soil.
Gently brush off excess soil, but don’t wash the bulbs. Instead, let them cure in a warm, dry, and well-ventilated area for 2-3 weeks. Curing hardens the necks and improves storage life.
Once cured, trim the roots and stems, leaving about 1 inch of stem attached to the bulb.
- Signs of readiness: Lower leaves brown, upper leaves green; bulbs visible at soil level.
- How to dig: Use a garden fork to loosen soil, then pull plants gently by hand.
- Curing process: Lay bulbs in a single layer in a dry, ventilated area for 2-3 weeks.
- Storage prep: Trim roots and stems after curing; store in a cool, dry place.
Tip: Harvest garlic on a dry day to prevent mold during the curing process.
Storing Garlic for Long-Term Use
Proper storage extends the life of your garlic harvest. After curing, store bulbs in a cool, dark, and dry place with good air circulation. Avoid storing garlic in the refrigerator, as the cold and humidity can cause sprouting or mold.
Softneck varieties store longer than hardneck types, often lasting up to a year under ideal conditions. Check stored bulbs regularly for signs of sprouting or rot, and remove any affected bulbs immediately to prevent spreading.
| Storage Method | Duration | Best For |
|---|---|---|
| Mesh bags | 6-12 months | Softneck varieties |
| Braided strings | 4-8 months | Softneck (braidable) |
| Paper bags | 3-6 months | Hardneck varieties |
Softneck garlic stores longer and can be braided for convenient hanging storage.
Frequently Asked Questions
Can I grow garlic from a grocery store bulb?
It’s not recommended. Grocery store garlic may be treated with growth inhibitors or carry diseases that can spread to your garden. Always use seed garlic from a reputable nursery or garden center for the best results.
How long does it take to grow garlic?
Garlic typically takes about 90 days to mature from planting to harvest. Fall-planted garlic may take slightly longer, as it overwinters before resuming growth in the spring. Spring-planted garlic usually matures in about 90-100 days.
Do I need to fertilize garlic?
Yes, garlic benefits from light fertilization. Use a balanced fertilizer (10-10-10) or compost tea every 2-3 weeks during the growing season. Avoid high-nitrogen fertilizers, as they can promote leafy growth at the expense of bulb development.
Why are my garlic plants yellowing?
Yellowing leaves can indicate overwatering, nutrient deficiencies, or pests. Check the soil moisture and ensure it’s well-draining. If the issue persists, test the soil for nutrient deficiencies or inspect plants for pests like aphids or onion thrips.
Can I grow garlic in containers?
Yes, garlic can be grown in containers as long as they are deep enough (at least 12 inches) and have good drainage. Use a well-draining potting mix and ensure the container receives plenty of sunlight. Keep in mind that container-grown garlic may produce smaller bulbs than garden-grown garlic.
Final Thoughts
Growing garlic is a rewarding experience that yields flavorful bulbs with minimal effort. By choosing the right variety, planting at the right time, and providing proper care, you can enjoy a bountiful harvest. Whether you’re a beginner or an experienced gardener, garlic is a versatile and low-maintenance crop that deserves a place in your garden.