Last Updated on October 22, 2026 by D. Ruddy
If you love cooking with fresh garlic but hate the store-bought taste, how to grow garlic at home might be easier than you think. Homegrown garlic offers superior flavor and avoids the chemicals often found in commercial varieties. With just a few cloves, some soil, and minimal care, you can harvest your own bulbs in months.
You can grow garlic at home by planting individual cloves in well-drained soil during fall or early spring. With proper spacing, sunlight, and occasional watering, you will harvest full bulbs in 8-10 months. The process requires minimal effort but yields flavorful, chemical-free garlic.
What You Need to Get Started
Growing garlic at home starts with gathering the right materials. Unlike many garden plants, garlic doesn’t require fancy equipment—just a few basics to ensure success.
- Garlic bulbs: Always use high-quality seed garlic from a nursery or organic grocery store. Avoid supermarket garlic, which is often treated to prevent sprouting.
- Well-draining soil: Garlic thrives in loose, fertile soil with good drainage. Sandy loam is ideal. If your soil is heavy clay, amend it with compost or aged manure.
- Sunlight: Choose a spot that gets at least 6-8 hours of direct sunlight daily. Partial shade can work, but full sun produces the best bulbs.
- Planting space: You’ll need about 4-6 inches between cloves and 12 inches between rows. Raised beds or containers work well if space is limited.
- Basic tools: A trowel, garden fork, and gloves are all you need. A watering can or hose with a gentle spray nozzle helps avoid disturbing the soil.
According to the National Gardening Association, garlic planted in well-prepared soil can yield up to 10 times the amount planted. This makes it one of the most rewarding crops for beginners.
Choosing the Right Garlic Variety
Not all garlic is the same, and picking the right type can make a big difference in flavor and growth. There are two main types: hardneck and softneck.
| Type | Flavor Profile | Cloves per Bulb | Cold Hardiness | Best For |
|---|---|---|---|---|
| Hardneck | Bold, spicy, complex | 4-12 | High | Cold climates, gourmet cooking |
| Softneck | Mild, sweet, long-lasting | 12-20 | Moderate | Warmer climates, storage |
| Elephant | Very mild, almost onion-like | 3-5 | Low | Mild climates, large cloves |
Hardneck varieties, like Rocambole or Purple Stripe, are popular among home gardeners for their robust flavor and ability to thrive in colder regions. Softneck types, such as Silverskin or Artichoke, are better suited for warmer climates and store longer. Elephant garlic, despite its name, is actually a type of leek and has a much milder taste.
Tip: For the best results, source seed garlic from a reputable supplier. Local farmers’ markets often sell varieties well-suited to your region.
Best Time to Plant Garlic
Timing is everything when it comes to growing garlic. Planting at the right time ensures your garlic develops strong roots before winter and produces large, healthy bulbs.
In most regions, the best time to plant garlic is in the fall, about 4-6 weeks before the ground freezes. This gives the cloves time to develop roots but not enough time to sprout above the soil. In warmer climates, you can also plant in early spring, as soon as the soil is workable.
- Fall planting (recommended for most areas): Aim for late September to November. The cloves will root over winter and be ready to sprout in early spring.
- Spring planting: If you missed the fall window, plant as soon as the soil thaws. Keep in mind that spring-planted garlic may produce smaller bulbs.
The University of Minnesota Extension reports that fall-planted garlic typically yields larger bulbs because it has a longer growing period. However, spring planting can still be successful with proper care.
Step by Step Planting Process
Step 1: Prepare the Soil
Garlic prefers loose, well-draining soil with a pH between 6.0 and 7.0. Start by removing any weeds and debris from your planting area. Work the soil to a depth of at least 12 inches, breaking up any clumps.
- Add a 2-3 inch layer of compost or well-rotted manure to enrich the soil.
- Mix in a balanced fertilizer (10-10-10) or organic matter like bone meal for added nutrients.
- Avoid fresh manure, as it can burn the cloves or introduce weeds.
- Test your soil pH if unsure. Garlic grows best in slightly acidic to neutral soil.
Important: Garlic hates soggy soil. If your garden has poor drainage, consider raised beds or containers to prevent rot.
Step 2: Break Down the Bulbs
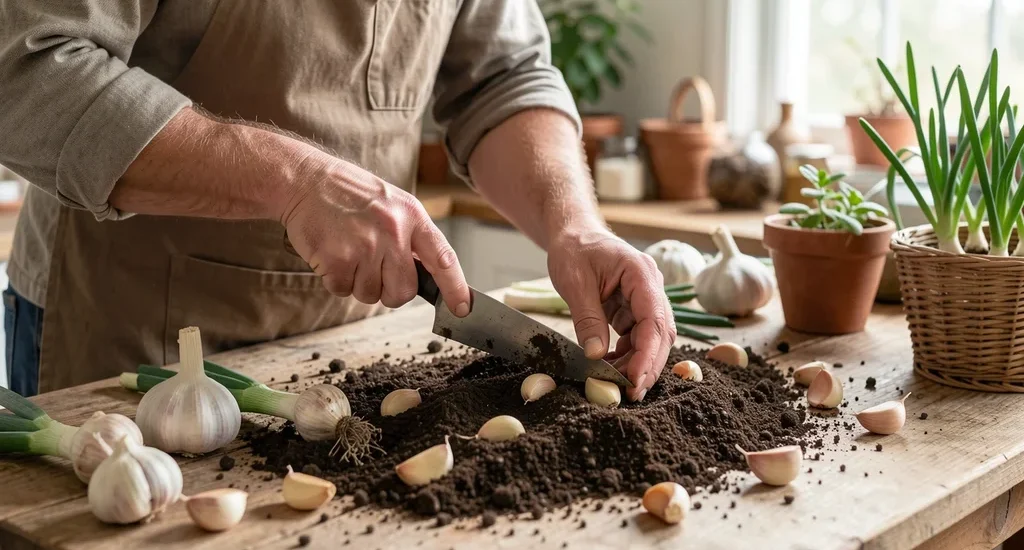
Before planting, you’ll need to separate the garlic bulbs into individual cloves. This process is simple but requires care to avoid damaging the cloves.
- Gently remove the outer papery skin from the bulb, but leave the skin on each individual clove.
- Separate the bulb into cloves, being careful not to break the base (the flat end where the roots will grow).
- Sort through the cloves and select the largest, healthiest ones for planting. Smaller or damaged cloves may not grow well.
- Save the smaller cloves for cooking—they won’t produce large bulbs.
Each clove you plant will grow into a new bulb, so bigger cloves generally mean bigger bulbs at harvest time.
Step 3: Plant the Cloves
Now it’s time to get the cloves into the ground. Proper planting depth and spacing are key to growing healthy garlic.
- Plant each clove pointy end up (the flat end is the root base) about 2 inches deep. In colder climates, plant slightly deeper (3 inches) for added winter protection.
- Space cloves 4-6 inches apart in rows that are 12 inches apart. This gives each plant enough room to grow without competing for nutrients.
- For raised beds or containers, you can space cloves a bit closer (3-4 inches apart).
- After planting, cover the cloves with soil and gently press down to remove air pockets.
If you’re planting in the fall, add a 4-6 inch layer of mulch (straw, leaves, or grass clippings) to insulate the soil and protect the cloves from freezing temperatures.
Step 4: Water and Mulch
After planting, water the cloves thoroughly to help them settle into the soil. Keep the soil moist but not waterlogged—garlic doesn’t like to sit in wet conditions.
- Water deeply once a week if there’s no rain. Garlic needs about 1 inch of water per week during the growing season.
- Reduce watering as the weather cools in late fall. Garlic needs very little water during winter dormancy.
- In spring, resume regular watering as the plants start to grow actively.
- Stop watering 1-2 weeks before harvest to help the bulbs cure and prevent rot.
Mulching is especially important for fall-planted garlic. It helps regulate soil temperature, retain moisture, and suppress weeds. Organic mulches like straw or shredded leaves work best.
Caring for Your Garlic Plants
Garlic is a low-maintenance crop, but a little care goes a long way toward a bountiful harvest. Here’s what you need to do to keep your plants healthy.
Fertilizing
Garlic is a heavy feeder, meaning it benefits from regular fertilization. Apply a balanced fertilizer or compost tea every 3-4 weeks during the growing season.
- Use a nitrogen-rich fertilizer in early spring to promote leaf growth.
- Switch to a phosphorus-rich fertilizer in late spring to support bulb development.
- Avoid high-nitrogen fertilizers late in the season, as they can lead to excessive leaf growth at the expense of bulb size.
- Organic options like fish emulsion, seaweed extract, or compost are great for garlic.
Tip: Yellowing leaves can be a sign of nitrogen deficiency. If you notice this, apply a nitrogen-rich fertilizer to perk up your plants.
Weed Control
Garlic doesn’t compete well with weeds, so keeping the planting area clean is essential. Weeds can steal nutrients and water, leading to smaller bulbs.
- Mulch heavily to suppress weeds. A 2-3 inch layer of organic mulch works wonders.
- Hand-pull any weeds that do appear. Be careful not to disturb the garlic roots.
- Avoid using herbicides, as garlic is sensitive to many chemicals.
- If weeds become a persistent problem, consider using landscape fabric or black plastic mulch.
Regular weeding also helps improve air circulation around the plants, reducing the risk of fungal diseases.
Pest and Disease Management
Garlic is relatively pest-resistant, but a few common issues can arise. Being proactive will help you avoid problems.
| Pest/Disease | Symptoms | Prevention/Treatment |
|---|---|---|
| Onion Maggots | Wilting, yellowing leaves, rotten bulbs | Rotate crops, use row covers, apply diatomaceous earth |
| White Rot | Yellowing leaves, black sclerotia in soil | Rotate crops, improve drainage, remove infected plants |
| Rust | Orange pustules on leaves | Remove infected leaves, improve air circulation, avoid overhead watering |
| Aphids | Curled leaves, sticky residue | Spray with water, use insecticidal soap, introduce ladybugs |
Crop rotation is one of the best ways to prevent pests and diseases. Avoid planting garlic or other alliums (onions, leeks, shallots) in the same spot more than once every 3-4 years.
Common Mistakes to Avoid
Even experienced gardeners can make mistakes when growing garlic. Here are some of the most common pitfalls and how to avoid them.
- Planting at the wrong time: Planting too late in the fall can result in poor root development before winter. Conversely, planting too early in spring may not give the garlic enough time to mature.
- Using supermarket garlic: Most store-bought garlic is treated with growth inhibitors to prevent sprouting. Always use seed garlic from a trusted source.
- Overwatering: Garlic prefers moist but not soggy soil. Overwatering can lead to rot and fungal diseases. Always check soil moisture before watering.
- Planting cloves too shallow: Cloves planted too close to the surface may not root properly or could be pushed out of the ground by freezing and thawing.
- Ignoring soil quality: Garlic needs loose, fertile soil to grow well. Heavy clay or sandy soil can lead to small, misshapen bulbs.
- Harvesting too early or too late: Harvesting too early results in small bulbs, while waiting too long can cause the bulbs to split or rot in the ground.
Avoiding these mistakes will significantly increase your chances of a successful garlic harvest.
When and How to Harvest Garlic
Knowing when to harvest your garlic is crucial. Harvest too early, and the bulbs will be small. Wait too long, and they may start to rot or split.
Signs of Readiness
Garlic is ready to harvest when the lower leaves turn brown and dry, while the upper leaves remain green. This usually happens in late spring or early summer, depending on when you planted.
- Hardneck garlic often produces a curly scape (flower stalk) before it’s ready. Remove the scape to encourage bulb growth.
- Softneck garlic typically doesn’t produce a scape. Look for yellowing lower leaves as a sign of maturity.
- Another way to check is to gently dig up one or two plants. If the bulb is fully formed and the cloves are plump, it’s time to harvest.
According to the Old Farmer’s Almanac, garlic planted in the fall is usually ready to harvest between late June and August, while spring-planted garlic may take until late summer.
Harvesting Process
Once your garlic is ready, harvest it carefully to avoid damaging the bulbs.
- Use a garden fork or trowel to loosen the soil around the plants. Be gentle to avoid bruising the bulbs.
- Grasp the plant by the leaves and pull it out of the ground. If the soil is dry and compacted, you may need to dig around the bulb first.
- Brush off excess soil, but don’t wash the bulbs. Wet garlic is more prone to rot.
- Leave the bulbs in a dry, shaded, and well-ventilated area to cure for 2-3 weeks. This helps the outer skins dry and harden, protecting the cloves inside.
Warning: Never leave garlic bulbs in direct sunlight after harvesting. The heat can cause them to cook or rot, ruining your harvest.
Curing and Storing Garlic
Proper curing and storage are essential to keep your garlic fresh and flavorful for months. Curing allows the outer layers to dry and tighten, which protects the cloves from moisture and mold.
- Curing location: Choose a dry, well-ventilated area out of direct sunlight. A garage, shed, or covered porch works well.
- Curing method: Lay the plants in a single layer on a flat surface or hang them in bundles from the ceiling. Ensure good air circulation around each bulb.
- Curing time: Allow the garlic to cure for 2-3 weeks. The outer skins should be dry and papery, and the roots should feel brittle.
- Trimming: Once cured, trim the roots and cut the stems to about 1-2 inches above the bulb. Leave the stems longer if you plan to braid your garlic.
After curing, store your garlic in a cool, dry, and dark place. Softneck varieties can be braided and hung, while hardneck varieties are best stored in mesh bags or baskets. Properly stored garlic can last 6-12 months, depending on the variety.
Frequently Asked Questions
Can I grow garlic from a clove bought at the grocery store?
While it’s possible, it’s not recommended. Most grocery store garlic is treated with growth inhibitors to prevent sprouting. Additionally, it may carry diseases that could affect your garden.
Always use high-quality seed garlic from a nursery or reputable supplier for the best results.
How long does it take to grow garlic?
Garlic has a long growing season. Fall-planted garlic typically takes 8-10 months to mature, while spring-planted garlic may take 5-6 months. The exact time depends on the variety and growing conditions.
Hardneck varieties usually mature faster than softneck types.
Why are my garlic plants producing scapes?
Scapes are the curly flower stalks that hardneck garlic produces. They appear in late spring or early summer and should be removed to encourage bulb growth. Scapes are edible and have a mild garlic flavor.
You can use them in cooking or make pesto.
Can garlic be grown in containers?
Yes, garlic can be grown in containers, making it a great option for those with limited space. Choose a pot that’s at least 8 inches deep and has good drainage. Fill it with loose, fertile soil, and plant cloves 4-6 inches apart.
Containers allow you to move the plants to optimal sunlight and protect them from extreme weather.
How do I know if my garlic is ready to harvest?
The most reliable sign is the leaves. When the lower leaves turn brown and dry, while the upper leaves remain green, your garlic is likely ready. You can also dig up a plant or two to check the bulb size.
Harvesting at the right time ensures the best flavor and storage life.
Final Thoughts
Growing garlic at home is a rewarding experience that yields flavorful, chemical-free bulbs with minimal effort. By choosing the right variety, planting at the correct time, and providing proper care, you can enjoy a bountiful harvest. Remember to cure and store your garlic properly to extend its shelf life.
Whether you’re a seasoned gardener or a beginner, garlic is a forgiving and low-maintenance crop that’s well worth the effort. Start small, follow these steps, and soon you’ll be enjoying the taste of homegrown garlic in all your favorite dishes.