

Last Updated on October 22, 2026 by D. Ruddy
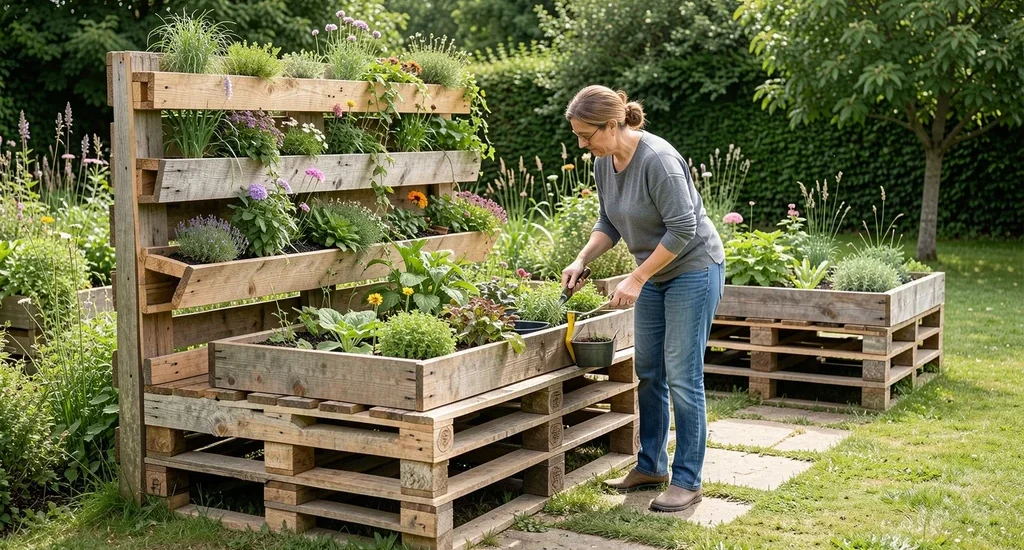
Transforming old wooden pallets into garden features is a budget-friendly way to add rustic charm to any outdoor space. With a little creativity, repurposed pallet garden projects can turn discarded materials into vertical planters, raised beds, or even cozy seating areas. These DIY solutions not only reduce waste but also create unique focal points that elevate your garden’s aesthetic.
You can build functional and stylish garden elements from pallets with basic tools and minimal cost. From herb gardens to compost bins, the possibilities are endless for eco-conscious gardeners.
Why Choose Pallets for Your Garden Projects
Pallets are an excellent material for garden projects because they’re sturdy, affordable, and widely available. Many businesses discard them after a single use, making them easy to source for free or at a low cost. Their slatted design allows for natural drainage, which is ideal for planters, and their modular structure makes them easy to customize.
Beyond practicality, repurposed pallets add a rustic, industrial aesthetic to gardens. They can be left natural for a weathered look or painted to match your outdoor decor. This versatility makes them perfect for both functional and decorative projects.
- Cost-effective: Often free or inexpensive to acquire
- Eco-friendly: Reduces landfill waste by upcycling
- Durable: Built to withstand heavy loads, making them great for outdoor use
- Customizable: Can be cut, stacked, or combined in countless ways
- Space-saving: Ideal for vertical gardening in small areas
Tip: Always check that pallets are heat-treated (marked with “HT”) rather than chemically treated to ensure they’re safe for gardening.
Essential Tools and Materials You Will Need
Before starting any repurposed pallet garden projects, gather the right tools to make the process smoother. Basic woodworking tools are usually sufficient, but having a few specialized items can help with precision and safety.
Safety gear is just as important as the tools themselves. Pallets often have rough edges, splinters, and nails that can cause injuries. Wearing gloves and safety glasses will protect you while handling and modifying the wood.
| Tool/Material | Purpose |
|---|---|
| Circular saw or handsaw | Cutting pallets to size |
| Sandpaper (80-120 grit) | Smoothing rough edges |
| Drill and screws | Assembling and securing pieces |
| Crowbar or pallet buster | Dismantling pallets safely |
| Staple gun | Attaching landscaping fabric |
| Wood stain or paint | Customizing appearance |
Having these tools on hand will ensure you can tackle most pallet projects efficiently. For beginners, start with simpler projects that require minimal cutting and assembly.
Step by Step Guide to Preparing Pallets for Garden Use
Proper preparation is key to ensuring your pallet garden projects last. Skipping this step can lead to splinters, instability, or even chemical leaching into your soil. Taking the time to clean and treat your pallets will pay off in the long run.
According to the Environmental Protection Agency (EPA), heat-treated pallets (marked “HT”) are safe for gardening, while chemically treated ones (marked “MB” for methyl bromide) should be avoided. Always inspect pallets for these stamps before use.
- Inspect and select pallets
Look for pallets in good condition with minimal cracks or rot. Avoid those with chemical stains or strong odors, as these may indicate toxic treatments. - Clean thoroughly
Scrub pallets with soapy water and a stiff brush to remove dirt, grease, and debris. For stubborn grime, a pressure washer can be effective. Let them dry completely in the sun for 24-48 hours. - Sand all surfaces
Use 80-grit sandpaper to remove splinters and rough spots, then switch to 120-grit for a smoother finish. Pay special attention to edges and corners where hands will frequently touch. - Disassemble if needed
For projects requiring individual slats, carefully remove nails with a crowbar or pallet buster. Work slowly to avoid splitting the wood. - Apply protective finish
Seal untreated wood with a non-toxic wood preservative or outdoor paint to protect against moisture. For edible gardens, use food-safe sealants.
Warning: Never use pallets from unknown sources for edible gardens. Chemical treatments can contaminate soil and harm plants you intend to consume.
10 Inspiring Repurposed Pallet Garden Projects
With your pallets prepped and ready, it’s time to explore some creative projects. These repurposed pallet garden projects range from simple to advanced, so there’s something for every skill level. Each idea can be customized to fit your space, style, and gardening needs.
1. Vertical Herb Garden for Small Spaces
A vertical pallet garden is perfect for growing herbs when space is limited. By standing the pallet upright and adding landscape fabric to create pockets, you can plant a variety of herbs in a compact footprint. This design also makes harvesting easy, as plants are at eye level.
- Ideal for: basil, thyme, oregano, mint, and other compact herbs
- Space required: 4 sq ft (standing pallet)
- Sunlight needs: 6-8 hours of direct sunlight daily
- Watering: Daily in hot climates, every other day in moderate weather
- Soil: Well-draining potting mix
| Pros | Cons |
|---|---|
| Maximizes vertical space | Requires frequent watering |
| Easy access for harvesting | May need additional support for stability |
| Great for small patios or balconies | Limited root space for larger plants |
Best For: Urban gardeners, apartment dwellers, or anyone with limited ground space.
2. Raised Garden Bed from Stacked Pallets
Create a durable raised bed by stacking and securing pallets into a rectangular frame. This project is ideal for growing vegetables, as the elevated design reduces bending and makes garden maintenance easier. Line the interior with landscape fabric to prevent soil loss while allowing drainage.
- Materials needed: 4-6 pallets, landscape fabric, screws, corner brackets
- Assembly time: 2-3 hours
- Depth: 12-18 inches (ideal for most vegetables)
- Soil volume: 8-10 cubic feet
- Lifespan: 5-7 years with proper maintenance
For added durability, reinforce the corners with metal brackets and consider adding a middle support beam for longer beds. This prevents bowing over time as the soil settles.
Best For: Vegetable gardeners, those with poor native soil, or people wanting easier access to their plants.
3. Pallet Compost Bin for Backyard Sustainability
Build a three- or four-sided compost bin using pallets to create an affordable and effective composting system. The slatted design provides excellent aeration, which is crucial for breaking down organic matter efficiently. This project can be as simple or elaborate as you like, from a basic three-pallet enclosure to a multi-bin system for different composting stages.
- Create a three-sided enclosure by screwing pallets together at the corners
- Add a fourth pallet as a removable front panel for easy access
- Line the interior with chicken wire to contain smaller materials
- Place the bin in a partially shaded area with good drainage
- Turn the compost every 1-2 weeks for faster decomposition
According to the US Composting Council, a well-maintained compost pile can reduce household waste by up to 30%. This pallet bin makes it easy to start composting at home.
Best For: Eco-conscious gardeners, those with yard waste, or anyone looking to improve their soil naturally.
4. Pallet Bench with Built-in Planters
Combine seating and greenery with a pallet bench that includes integrated planters. This dual-purpose project creates a cozy spot to relax while adding more planting space to your garden. The design typically uses pallets for both the seat and the backrest, with additional slats forming the planter boxes on either side.
- Seating area: 4-5 pallets (for a 6-foot bench)
- Planter dimensions: 12″ x 24″ x 8″ (per side)
- Weight capacity: 300-400 lbs when properly reinforced
- Customization: Add cushions, paint, or decorative elements
- Plants: Flowers, small shrubs, or trailing plants
Important: Use exterior-grade screws and reinforce all joints for safety. The bench should be stable enough to support the weight of multiple people.
Best For: Patio areas, garden paths, or as a focal point in larger yards.
5. Pallet Tool Organizer for Garden Sheds
Keep your garden tools organized with a pallet-mounted storage system. By attaching hooks, brackets, and small shelves to a pallet, you can create a functional wall organizer that keeps everything within reach. This project is especially useful for small sheds or garage spaces where floor space is limited.
| Storage Feature | Tools It Holds |
|---|---|
| Large hooks | Shovels, rakes, hoes |
| Small hooks | Hand trowels, pruners, shears |
| Shelves | Pots, gloves, small containers |
| Baskets | Seeds, twine, small accessories |
Mount the organizer on a sturdy wall or lean it against a fence. For added durability, treat the pallet with a weather-resistant sealant to protect it from the elements.
Best For: Gardeners with limited storage space, those who want to keep tools visible and accessible.
6. Pallet Greenhouse for Extended Growing Season
A pallet greenhouse allows you to start seeds earlier in the spring and extend your growing season into the fall. This project involves creating a frame from pallets and covering it with clear plastic sheeting or old windows. The size can vary from a small cold frame to a walk-in greenhouse, depending on your needs and available space.
- Small cold frame: 2-3 pallets (2′ x 4′ size)
- Medium greenhouse: 6-8 pallets (4′ x 6′ size)
- Covering materials: 6 mil plastic sheeting, old windows, or greenhouse film
- Ventilation: Add a small window or vent at the top for temperature control
- Foundation: Place on level ground or a gravel base for stability
Studies by the University of Massachusetts Extension show that even a simple cold frame can extend the growing season by 4-6 weeks in both spring and fall.
Best For: Gardeners in cooler climates, seed starters, or those wanting to grow plants year-round.
7. Pallet Pathway for Garden Walkways
Create an attractive and functional garden path using pallet wood. This project involves dismantling pallets and using the slats to create a wooden walkway through your garden. The natural wood blends beautifully with plantings and can be arranged in various patterns for visual interest.
- Dismantle pallets and remove all nails from the slats
- Lay out your pathway design on the ground
- Create a base of gravel or sand for drainage
- Lay the pallet slats, leaving small gaps for expansion
- Secure with outdoor screws or nails
- Seal with a weather-resistant finish to prevent rot
For a more polished look, consider staining the wood or arranging the slats in a herringbone pattern. This adds both functionality and aesthetic appeal to your garden.
Best For: Garden paths, between raised beds, or as a decorative element in landscape design.
8. Pallet Birdhouse or Bee Hotel
Support local wildlife by creating pallet birdhouses or bee hotels. These small structures provide essential habitats for birds and solitary bees, which are crucial pollinators for your garden. A single pallet can yield enough wood to make multiple small birdhouses or a multi-compartment bee hotel.
- Birdhouse: Use thicker pallet wood for durability; add a hinged roof for easy cleaning
- Bee hotel: Drill holes of varying diameters (3-10mm) in pallet blocks; ensure holes are 4-6 inches deep
- Placement: Mount birdhouses 5-10 feet high; place bee hotels in sunny, sheltered spots
- Materials: Untreated wood, non-toxic paint (optional), waterproof roof
- Maintenance: Clean birdhouses annually; replace bee hotel tubes every 2-3 years
The Xerces Society reports that native bees are responsible for pollinating about 80% of flowering plants worldwide. Providing habitat helps support these vital insects.
Best For: Wildlife enthusiasts, organic gardeners, or those looking to increase pollination in their garden.
9. Pallet Potting Bench for Garden Workspace
A potting bench made from pallets provides a dedicated workspace for repotting plants, starting seeds, and storing gardening supplies. This project typically uses pallets for both the work surface and the lower shelf, with additional features like hooks for tools and a backstop to keep soil contained.
| Feature | Benefit |
|---|---|
| Elevated work surface | Reduces back strain |
| Lower shelf | Extra storage for pots and tools |
| Hooks and brackets | Keeps tools organized and accessible |
| Backstop | Prevents soil spillage |
Add a waterproof membrane to the work surface for easy cleanup, and consider including a small sink if you have access to a water source. This creates a truly functional outdoor workspace.
Best For: Serious gardeners, those with limited indoor space, or anyone who wants a dedicated gardening area.
10. Pallet Privacy Screen for Garden Seclusion
Create a natural privacy screen using pallets to section off areas of your garden or block unsightly views. This project can be as simple as standing pallets vertically and screwing them to posts, or as elaborate as creating a lattice-like design with spaced slats. Add climbing plants like ivy, jasmine, or roses for a living wall effect.
- Height options: Standard pallets (40″ tall) or stacked for taller screens
- Placement: Attach to existing fences, posts, or freestanding frames
- Plant choices: Fast-growing climbers like morning glories, clematis, or honeysuckle
- Spacing: Leave gaps between pallets for airflow and plant growth
- Customization: Paint or stain to match your garden’s color scheme
A well-placed privacy screen can also serve as a windbreak, protecting more delicate plants from strong gusts. This dual functionality makes it a practical addition to any garden.
Best For: Urban gardens, creating outdoor rooms, or adding vertical interest to flat landscapes.
Common Mistakes to Avoid with Pallet Garden Projects
While pallet projects are generally beginner-friendly, there are some common pitfalls that can derail your efforts. Being aware of these mistakes will help you create safer, more durable, and more attractive garden features.
One of the most critical errors is failing to properly prepare the pallets. Skipping the cleaning and sanding steps can result in splinters, unstable structures, or even chemical contamination of your soil. Always take the time to inspect, clean, and treat your pallets before beginning any project.
- Using chemically treated pallets for edible gardens
Always check for the “HT” (heat-treated) stamp. Pallets marked “MB” (methyl bromide) or “DB” (debris) may contain harmful chemicals that can leach into your soil and affect edible plants. - Skipping the sanding process
Rough, unsanded pallets can cause splinters and make your projects uncomfortable to touch. Sand all surfaces, especially edges and corners, for a smooth finish. - Not reinforcing joints properly
Pallets are designed to hold weight when horizontal, but vertical or structural uses require additional reinforcement. Always use exterior-grade screws and add support brackets where needed. - Ignoring drainage needs
For planter projects, ensure there are adequate drainage holes. Without proper drainage, plants can suffer from root rot, and the wood may deteriorate faster. - Overloading vertical structures
Vertical pallet gardens have weight limits. Overloading with heavy soil and plants can cause the structure to topple. Distribute weight evenly and secure the pallet to a wall or fence if needed. - Using pallets with rot or insect damage
Inspect pallets carefully for signs of rot, mold, or insect infestation. These issues can spread to your garden and other structures.
Important: When in doubt about a pallet’s safety, it’s better to err on the side of caution and choose a different one. Your health and the success of your garden depend on it.
Pro Tips for Long-Lasting Pallet Garden Projects
To get the most out of your repurposed pallet garden projects, follow these expert tips for durability and longevity. Proper construction and maintenance will ensure your creations withstand the elements and remain functional for years to come.
One of the best ways to extend the life of your pallet projects is to use the right materials for the job. Exterior-grade screws, weather-resistant finishes, and proper sealing can make a significant difference in how long your projects last.
- Choose the right pallets:
- Look for pallets made from hardwoods like oak or maple, which are more durable than softwoods
- Avoid pallets with large cracks, splits, or signs of water damage
- Select pallets with fewer nails for easier disassembly
- Use proper fasteners:
- Exterior-grade screws are better than nails for most projects as they hold tighter
- Stainless steel or coated screws resist rust and corrosion
- Use corner brackets for added stability in larger structures
- Protect against moisture:
- Apply a waterproof sealant to all surfaces, especially end grain
- Elevate projects off the ground using bricks or pressure-treated lumber
- Use landscape fabric to line planters and prevent soil contact with wood
- Enhance functionality:
- Add casters to pallet furniture for easy mobility
- Incorporate hooks, shelves, or other organizational features
- Use pallet wood to create matching garden signs or labels
- Regular maintenance:
- Inspect projects annually for signs of wear or damage
- Reapply sealant every 1-2 years to maintain protection
- Replace any broken or rotting wood promptly
How to Source Quality Pallets for Your Projects
Finding good pallets is the first step in any successful pallet garden project. Knowing where to look and what to look for can save you time and ensure you get materials that are safe and suitable for your needs.
Many businesses receive shipments on pallets and are happy to give them away for free. The key is to know which types of businesses are most likely to have the pallets you need and to establish a good relationship with them for future projects.
| Source | Pros | Cons |
|---|---|---|
| Local businesses | Often free, wide variety | May need to check for safety |
| Hardware stores | Reliable source, often clean | May charge a small fee |
| Online marketplaces | Convenient, can find specific types | May have delivery costs |
| Construction sites | Often have many pallets | May be dirty or damaged |
| Craigslist/Facebook Marketplace | Often free, can find in bulk | Need to transport yourself |
When sourcing pallets, always ask about their history. Pallets used for food, pharmaceuticals, or other clean industries are generally safer than those from chemical or industrial settings. Also, consider the size of the pallets—standard sizes are 40″ x 48″ and 42″ x 42″, but you may find others that suit specific projects.
Tip: Build a relationship with local businesses that receive regular pallet shipments. Many will set aside clean, undamaged pallets for you if you ask nicely and pick them up regularly.
Frequently Asked Questions
Are pallet garden projects safe for growing vegetables?
Yes, but only if you use pallets that are marked “HT” (heat-treated) rather than chemically treated. Heat-treated pallets are safe for edible gardens as they haven’t been exposed to harmful chemicals. Always line planters with landscape fabric to create an additional barrier between the wood and soil.
How long do pallet garden projects typically last?
With proper preparation and maintenance, pallet garden projects can last 5-7 years or more. The lifespan depends on factors like wood type, exposure to elements, and whether the pallet was properly sealed. Regular re-sealing and repairs can extend the life of your projects significantly.
Do I need special tools to work with pallets?
Basic woodworking tools are usually sufficient for most pallet projects. A circular saw or handsaw, drill, sandpaper, and crowbar (for dismantling) are the most commonly needed tools. For more advanced projects, you might also need a staple gun, level, or clamps.
Can I paint or stain my pallet garden projects?
Absolutely! Painting or staining can enhance the appearance of your projects and provide additional protection against the elements. For edible gardens, use non-toxic, food-safe paints or stains.
Always allow the finish to cure completely before planting.
What’s the easiest pallet garden project for beginners?
The vertical herb garden is one of the simplest projects for beginners. It requires minimal cutting and assembly—just stand a pallet upright, add landscape fabric to create pockets, and fill with soil and plants. This project can typically be completed in an afternoon with basic tools.
Final Thoughts
Repurposed pallet garden projects offer a creative and eco-friendly way to enhance your outdoor space. From vertical gardens to functional furniture, the versatility of pallets allows for endless possibilities. With proper preparation, the right tools, and a bit of creativity, you can transform discarded materials into beautiful and practical garden features that will last for years.








